Tag
Agile Teams
 Agile Best Practice
The Three Phases of RTE Maturity
If you're a Release Train Engineer managing multiple teams, you've probably noticed something: the problems you're solving in month six look nothing like the ones you're tackling in year three.
That shift isn't random. Through conversations with RTEs across automotive, finance, and tech sectors, we've seen a clear pattern emerge. RTE needs evolve through three distinct phases as organisations mature with SAFe.
I spoke to Daniel Rozen, an experienced RTE in the automotive industry, who shows how understanding these phases helps you set realistic expectations, choose the right tools, and build practices that actually stick.
Phase 1: Establishment
"The first phase is the hardest one. It's establishing the routines, establishing the processes, establishing the tools. That takes a lot of energy and a lot of conflicts. That's the first year."
This is the building-from-scratch phase. Teams haven't worked together before. People are sceptical about SAFe ceremonies. Every PI planning feels like herding cats.
You're simultaneously getting teams to adopt new practices, resolving conflicts about process, building trust across groups with competing priorities, and trying to align everyone on what "done" actually means.
What success looks like:
Teams show up prepared. Basic ceremonies happen consistently. Tools get adopted. Cross-team collaboration starts emerging. Conflicts decrease.
What to focus on:
Simple processes teams can follow. Tools that reduce friction and make new practices tangible. Building relationships. Celebrating small wins.
Phase 2: Consolidation
"The second year is consolidation. Okay, now we understand each other and now we're working with the same tools. And in the consolidation part, as an RTE, you start to let go more—let the Scrum Masters take more charge into their work."
The routines work. Teams know what's expected. Scrum Masters lead their teams through planning. You're not constantly firefighting anymore.
This is where "making it happen" becomes "making it sustainable." You're letting go of day-to-day facilitation, empowering Scrum Masters to own their planning, standardising approaches, tracking delivery metrics, and building confidence the system runs smoothly.
What success looks like:
Teams self-organise during planning with minimal guidance. Dependencies get managed by teams themselves. You're consistently delivering meaningful percentages of planned work. Scrum Masters are confident. You have time to think beyond the current PI.
What to focus on:
Consistency across teams. Metrics showing delivery against plans. Dependency practices teams can execute themselves. Coaching Scrum Masters. Creating systems that work without you.
Phase 3: Strategic Optimisation
"Then the third stage—that's where I am right now—which is, okay, now everyone knows what to do. Things are working, they're delivering 70%-75% of what they're planning... Then I like challenges, you know. So I start looking into things that will add value."
The system hums. Teams deliver 70-80% of planned work. PI planning runs smoothly. Dependencies get managed proactively. Scrum Masters lead confidently.
Then leadership starts asking different questions. What should we plan three PIs ahead? How much will strategic initiatives cost in people and time? How do we prioritise competing objectives? What's our capacity next quarter? How do our Agile Release Trains connect at solution level?
Your role shifts from operational facilitation to strategic planning. You're planning multiple PIs ahead, connecting ART work to portfolio strategy, estimating resource needs, optimising value delivery, and thinking about cost, capacity, and strategic alignment.
What success looks like:
Sustained 75-80% delivery. Proactive capacity planning for future PIs. Clear connection between team work and business strategy. Data-driven programme decisions. Teams improving without your intervention.
What to focus on:
Strategic roadmap planning beyond current PI. Understanding business value and cost of ART objectives. Capacity planning across multiple PIs. Connecting ART planning to portfolio decisions. Evolving tools and practices for strategic work.
Don't Judge Phase 1 by Phase 3 Standards
New RTEs sometimes get frustrated their teams aren't delivering predictably in the first six months. But establishing foundations takes time.
If you're getting teams to show up, collaborate, and start following the process, that is success in Phase 1.
"The first phase is the hardest one... That takes a lot of energy and a lot of conflicts."
The consolidation phase builds trust. Teams learn they can deliver what they commit to. Leadership learns the system works. You learn it runs without constant firefighting.
When teams deliver consistently and mechanics work smoothly, organisations naturally ask for strategic thinking. That's not a failure of earlier practices. It's evidence they're working well enough that leadership wants to leverage them strategically.
How Programs Supports This Journey
We built Easy Agile Programs specifically to help teams and RTEs through establishment and consolidation, where sustainable practices get built.
Making Cross-Team Planning Tangible
When teams start planning together at scale, abstract concepts need concrete expression.
"It's a different view that Jira doesn't provide."
Teams see how their work connects to others. Dependencies become visible. PI planning stops being theoretical and becomes something they can actually do.
The biggest barrier to adoption is tool friction. When teams maintain epics in Jira and recreate them in planning boards, they resist the process.
"We decided to look for a tool that will allow us to connect to Jira directly and not do double booking—one booking in Jira and then creating post-its, which is useless."
Programs eliminates this. Teams plan once, in a tool already integrated with their daily workflow.
Building Consistency and Confidence
As teams mature, standardisation becomes critical.
"Standardisation. That each team can put their epics quite easily, plan their user stories, plan their story points. They can explain the objectives that they have committed to, what they have not committed to."
Every team plans the same way. This consistency makes it easier to see patterns, compare performance, and build organisational muscle memory.
"It helps them to plan according to their capacity, which is super important."
Teams learn realistic planning. Over time, this builds the predictability that defines Phase 2 success.
"It really helps them to collaborate between the different teams at the same time."
As Scrum Masters take ownership, they need tools enabling collaboration without constant RTE facilitation. Programs provides the visibility and structure making team-led planning possible.
Why This Foundation Matters
Daniel has used Programs for five years. When asked what would happen if it disappeared:
"No, then I'm completely lost... it will require a lot more of my time to work on things that don't add value, because that's what Easy Agile gives us—I mean, the facility of visualisation and transparency. So it will demand much more time from my perspective and for the Scrum Masters."
The value isn't just individual features. It's building sustainable practices that free RTEs from operational firefighting so they can focus on strategic work in Phase 3.
What Phase 3 Brings
As RTEs move into Phase 3, needs naturally evolve beyond team-level planning.
RTEs think 2-3 PIs ahead, connecting current work to long-term strategy. Questions shift from "are teams planning well?" to "are we delivering the right work across the entire ART?"
Leadership wants to understand not just what teams can do this PI, but what's possible over the next year given available capacity. ART planning needs connecting to solution and portfolio-level strategy.
These are natural evolutions as organisations mature. The practices and tools getting you to Phase 3 become the foundation for solving these new challenges.
We're committed to understanding how RTE needs evolve and building capabilities serving teams and RTEs at every maturity phase.
Lessons from Experienced RTEs
Build End-to-End Teams from the Start
"Build end-to-end teams, really looking to the flows. Not to change from a line perspective to this way of working without actually asking yourself, 'What is the end-to-end?' Many companies do that in the beginning, and then they realise that we just changed from our line to some groups, and we didn't fix anything."
Team structure determines coordination overhead. Well-structured end-to-end teams reduce dependencies and enable faster delivery.
See the Big Picture Before You Divide
"Always see the big picture, the strategic—where are we heading—and start dividing the different Agile Release Trains from that perspective and implement. So even though there are good examples at the bottom, it's better—let's see the big picture of the whole company and how to transform the whole company."
Bottom-up adoption can work, but top-down strategic thinking about how ARTs fit together prevents future restructuring pain.
Give Teams the Right Tools
"If we want to work in this way, we need to provide the right tools that will actually motivate the people to plan."
Process changes without tooling support create frustration and resistance. The right tools make new ways of working easier, not harder.
Expect the Journey to Take Time
Establishment to consolidation to strategic optimisation takes years, not months. Sustainable change happens through consistent practice over time. It’s a process of building solid foundations in Phase 1, consolidated your position in Phase 2, and optimising continuously in Phase 3.
What Phase Are You In?
Phase 1:
Focus on adoption and routines. Celebrate progress, not perfection. Choose tools reducing friction. Invest in training and relationships. Be patient.Phase 2:
Standardise approaches. Empower Scrum Masters. Track delivery metrics. Create systems working without constant intervention. Look ahead to strategic needs.Phase 3:
Think strategically about capacity and roadmaps. Connect ART work to portfolio strategy. Evolve tooling for programme-level visibility. Focus on value optimisation. Consider how practices scale to solution level.Your phase determines what success looks like. Don't judge Phase 1 performance against Phase 3 expectations.
Building for Years, Not Quarters
The three-phase framework shows RTE success is a journey, not a destination.
Practices and tools serving you brilliantly in Phase 1 become the foundation for Phase 2. Consistency and predictability built in Phase 2 enable Phase 3's strategic thinking. Phase 3 brings new challenges driving further evolution.
Programs helps teams and RTEs establish sustainable practices, build consistency and confidence, and create foundations for long-term success.
We know needs evolve. We're listening to experienced RTEs about what comes next. We're building with the understanding your success is measured in years, not quarters.
Ready to see how Programs supports your phase? Learn more about Easy Agile Programs
 Agile Best Practice
Agile Team Trends 2026: Research Insights on Collaboration, Planning, and Delivery
Every year brings another round of agile predictions. Most are speculation dressed up as insight.
This one is different.
We surveyed 419 engineers, product managers, and project managers across companies ranging from 50 to over 5,000 employees in the US, UK, Germany, Canada, and Australia. We asked them how they actually work: how they estimate, how they plan sprints, how they run retrospectives, and where things fall apart. Here's the full version of the State of Team Alignment 2026, if you're interested.
And the findings revealed something interesting - teams are confident, collaborative, and still struggling to deliver predictably.
Here's what the data says about where product and engineering teams will need to focus in 2026.
Most teams are confident in their estimates. The data says they shouldn't be.
When we asked how confident team members feel about their estimates, 63% reported feeling "very" or "extremely" confident. Another 24% said "moderately confident."
That sounds healthy. But when we asked how often tasks end up significantly larger or smaller than estimated, 44% of teams said this happens on roughly half their work or more.
There's a gap between how teams feel about estimation and how estimation actually performs.
Part of the explanation lies in method. Only 31% of teams use collaborative estimation techniques like Planning Poker. The rest split between asynchronous or solo estimation (37%) and having a single person estimate for the whole team (30%). When estimation happens in isolation, there's no opportunity to surface the questions that reveal hidden complexity. The senior developer who knows the authentication system is brittle doesn't get to flag that the "simple" login change will require refactoring. The new team member doesn't get to ask the clarifying question that exposes a misunderstood requirement.
There's also the question of what teams are estimating. Most estimate time: 55% use hours or days. But time and complexity aren't the same thing. A junior developer updating button colours across multiple pages and a senior developer debugging a race condition in an API call might both get estimated at three hours. The difference is that the button task will probably take three hours. The race condition might take three hours or twelve, depending on whether the first hypothesis is right.
When most estimation is time-based and most estimation happens solo, variance is predictable.
What 2026 demands
Teams that want to improve sprint predictability need to move estimation from a box-ticking exercise to a conversation. That doesn't necessarily mean adopting Planning Poker wholesale. It might mean adding a five-minute discussion for any item flagged as high-complexity. It might mean asking "what could make this bigger than we think?" before committing to a number. The teams in our survey who estimate collaboratively report higher confidence, and their confidence is better calibrated to reality.
For a deeper look at estimation patterns and how teams are addressing variance, download the full State of Team Alignment 2026 report.
80% of teams roll work forward. Dependencies are the main reason.
Sprint rollover isn't a sign of failure. Some amount of incomplete work is normal. But the scale matters.
Only 20% of teams in our survey reported minimal rollover (0-10% of planned work). The remaining 80% regularly move incomplete work to the next sprint. Over a third are rolling 26-50% of their planned work forward.
When we asked what causes rollover, the top answer was dependency delays, at 36%.
This makes sense. Software development is interconnected work. Your feature needs an API from another team. Your frontend work is waiting on backend decisions. Your deployment is blocked by a security review that's running behind schedule. Any delay upstream automatically pushes your work downstream.
The challenge is that most teams lack visibility into these dependencies until they become blockers. When we asked about planning tools, 59% of teams use spreadsheets. Only 33% use Jira's native boards.
And most teams aren't using spreadsheets alone - they're combining them with two or three other systems, creating fragmented workflows where planning lives in one place, discussions happen in another, and work tracking happens in a third. That fragmentation hides dependencies. You can't see what other teams are doing or when blocking work will be completed.
The other causes of rollover vary by company size. Smaller companies (50-249 employees) struggle most with under-estimation. Mid-size companies (250-4,999 employees) cite scope change as the second biggest factor. Large enterprises (5,000+ employees) point to team capacity issues alongside dependencies.
What 2026 demands
The fix for rollover depends on its cause. If dependencies are your primary blocker, you need visibility into cross-team work before you commit to a sprint, not after you're already stuck. If scope change is derailing your sprints, the issue is likely upstream: requirements that aren't stable enough when they hit planning. If under-estimation is the problem, the answer loops back to collaborative estimation and better backlog refinement.
One tactical shift that works across all these scenarios: plan to 80% capacity. Assume 20% of your sprint will be consumed by the unexpected. That buffer gives you room to absorb delays without automatically rolling work forward.
The full report breaks down rollover causes by company size and includes specific strategies for each pattern.
Retrospectives surface good ideas. Half never get implemented.
Teams believe in retrospectives. When we asked how effective retros are at identifying meaningful improvements, 61% rated them "very" or "extremely" effective. Frequency is mostly solid too: 30% run retros every sprint, and another 55% run them every two to three sprints.
The problem is follow-through.
When we asked what percentage of retro action items get fully implemented before the next retro, the median was around 50%. Nearly 70% of teams implement less than 60% of the improvements they identify.
The biggest obstacle is that 29% of actions require changes beyond the team's control, and another 21% never get prioritised in sprint planning. Nearly half of retro actions fail before they start - either because the team can't fix the problem themselves, or because improvement work doesn't make it into the actual work queue.
The remaining obstacles are execution gaps: no accountable owner assigned (17%), no tracking of whether action was taken (13%), or vague action items that aren't specific enough to implement (15%). The report includes verbatim responses from survey participants on what they'd change about their retro process - worth reading if you're trying to diagnose where your team's follow-through breaks down.
Teams are identifying the right problems. They're just not set up to solve them.
What 2026 demands
The shift is simple but requires discipline: treat retro actions like real work. Create a ticket for every action item. Add it to the next sprint during planning. If it doesn't deserve sprint capacity, it probably shouldn't have been an action item in the first place.
For issues beyond the team's control—the 29% that require organisational change—escalate them immediately to stakeholders rather than letting them sit on a list that never gets addressed. And assign owners before leaving the retro. An action without a name attached is an action that won't happen.
Three changes to make this quarter
The data points to specific, practical shifts. Not a new framework. Not another meeting about meetings. While The State of Team Alignment 2026 report includes additional recommendations broken down by team size and role, these three apply broadly.
1. Add a complexity conversation to estimation.
Pick your highest-risk items each sprint and spend five minutes discussing what could make them bigger than expected. Surface the hidden dependencies. Ask the clarifying questions. That conversation is where estimation accuracy actually improves.
2. Map dependencies before you commit.
Before sprint planning, identify which items depend on other teams, external vendors, or sequential work within your own team. Reach out to those parties before you lock in the sprint. If you can't get clarity on a blocker, that item probably shouldn't be in this sprint.
3. Make one retro action a ticket.
Just the most impactful one. Give it an owner, acceptance criteria, and an estimate. Put it in the sprint. Track it like you'd track any other work. That single change closes the gap between identifying improvements and actually making them.
Get the full picture. The State of Team Alignment 2026 report includes detailed breakdowns by company size, role, and geography, plus additional findings on tool usage, planning methods, and team dynamics.
Download the full report →
Frequently asked questions
What are the biggest agile trends for 2026?
Research from Easy Agile's State of Team Alignment 2026 report, which surveyed 419 development professionals, points to three areas where teams will need to focus: closing the gap between estimation confidence and actual delivery accuracy, improving visibility into cross-team dependencies that cause sprint rollover, and converting retrospective insights into implemented changes. The data shows 80% of teams experience significant rollover and only half of retro action items get completed, suggesting these execution gaps, not new methodologies, will define team improvement efforts in 2026.
Why do agile teams struggle with sprint planning accuracy?
According to the State of Team Alignment 2026 survey, several factors contribute to sprint planning challenges. Only 31% of teams use collaborative estimation techniques, meaning most teams miss the discussions that surface hidden complexity. Additionally, 55% of teams estimate in time rather than complexity, which obscures the uncertainty inherent in difficult tasks. When estimation happens in isolation and focuses on hours rather than risk, variance increases. The survey found that teams using collaborative approaches like Planning Poker report higher and more accurate confidence in their estimates.
How can teams reduce sprint rollover?
The State of Team Alignment 2026 report found that dependency delays cause 36% of sprint rollover - more than scope change, under-estimation, or unplanned work. Teams can reduce rollover by mapping dependencies before committing to sprint scope, planning to 80% capacity to absorb unexpected delays, and addressing the specific rollover cause for their organisation size. Smaller companies tend to struggle with estimation accuracy, mid-size companies with scope change, and large enterprises with capacity and cross-team coordination.
Why don't retrospective action items get implemented?
Easy Agile's 2026 research found that 69% of teams implement less than 60% of their retro actions. The primary obstacles are that 29% of improvements require changes beyond the team's control, and 21% never get prioritised in sprint planning. Teams that treat retro actions as actual sprint work - with tickets, owners, and estimates, see better follow-through. The report recommends focusing on changes within the team's control, escalating systemic issues to stakeholders immediately, and assigning owners before the retro ends.
What estimation methods do agile teams actually use?
The State of Team Alignment 2026 survey found that estimation approaches split three ways: 37% use asynchronous or solo estimation, 31% use collaborative techniques like Planning Poker, and 30% rely on a single person (such as a tech lead or product owner) to estimate for the team. For units, 55% estimate in time (hours or days), 18% use relative sizing without specific units, 12% use story points, and 10% use t-shirt sizes. Teams using collaborative methods reported higher confidence and better calibration between estimates and outcomes.
How do team collaboration challenges differ by company size?
The State of Team Alignment 2026 report surveyed companies ranging from 50 to over 5,000 employees and found distinct patterns. At smaller companies (50-249 employees), under-estimation is the top challenge alongside dependencies. Mid-size companies (250-4,999 employees) struggle more with scope change during sprints. Large enterprises (5,000+ employees) face team capacity issues and cross-team coordination as primary obstacles. These differences suggest that collaboration improvements should be tailored to organisational context rather than applied uniformly.
 Workflow
When the Numbers Don't Matter: Why Teams Miss Deadlines Despite Perfect Estimates
TL;DR
Agile estimation challenges are rarely about the number. Planning poker is useful when teams treat vote spreads as signals about scope, risk, and dependencies. Software team alignment during estimation improves sprint predictability more than chasing velocity. Velocity alone cannot forecast capacity because context changes across sprints. Coordination work must live in Jira as first-class items, or retro actions will not get done. Easy Agile TeamRhythm keeps planning and estimation in one place: story mapping for sequence, planning poker on the issue for shared context, and retrospective actions that turn into tracked work. The new ebook, Guide to Building Predictable Delivery with Jira in 2026, explains how to plan with clarity, align on effort, and turn problems into progress. The outcome is fewer rollovers, clearer handoffs, and more reliable delivery.
---
Estimation in software teams has become a performance ritual. Planning poker sessions run smoothly, story points get assigned, and even velocity charts trend upward.
Yet research analysing 82 studies found five recurring reasons why estimates fail: information quality, team dynamics, estimation practices, project management, and business influences.
The point is, the problem with estimations runs deeper than accuracy - it's about what teams miss whilst focusing on the number.
When a team estimates a story and three people say it's a 3 whilst two say it's an 8, that spread contains more value than whatever final number they settle on. The disagreement signals different assumptions about scope, reveals hidden dependencies, exposes risks before code gets written. But most teams treat the spread as a problem to resolve rather than intelligence to extract. They discuss just long enough to reach consensus, record the number, move on.
The estimation ritual runs perfectly, while the coordination that estimation should enable never happens.
Why the number misses the point
Communication, team expertise, and composition decide how reliable an estimation will be, far more than the technique itself.
A team of senior engineers who've worked together for years will generate different estimates than a newly formed team with mixed experience, even looking at identical work. Neither set is wrong - they reflect different realities.
Problems emerge when organisations ignore this context and treat estimates as objective measurements.
Story points get summed across teams. Velocity gets compared across squads. Estimates meant to help one group coordinate become data points in dashboards, stripped of the shared understanding that gave them meaning.
What planning poker actually reveals
Planning poker works when teams use it to promote collaboration, uncover risks, and address uncertainties proactively. Those benefits vanish when teams rush past disagreement to reach a number.
Someone who estimates low might:
- Know a shortcut from previous work
- Have solved something similar before
- Understand a technical approach others haven't considered
Someone who estimates high might:
- Have spotted an integration challenge
- Questioned an assumption in the requirements
- Remembered something that broke last time
- Identified a missing dependency
Both pieces of knowledge matter more than splitting the difference.
Teams that skip this interrogation lose their only reliable way to discover what they don't yet know. Later, when work takes longer than estimated, they blame the estimation technique. They should blame the coordination failure that happened during estimation.
How team members add context
Research indicates that even team members whose skills aren't needed for an item contribute valuable questions during planning poker.
The database person asks about data volume. The designer notices a missing edge case. The platform maintainer flags a version incompatibility.
None of them are trying to make the estimate bigger to protect themselves. They're raising legitimate technical considerations that affect how much work is actually involved. These questions reveal real complexity the team needs to account for. That's different from someone saying "Let's call it an 8 instead of a 5, just to be safe" without any specific reason (that's called "padding", and a team must avoid that at all costs).
When estimation becomes a solo activity or a quick management decision, all that context disappears. Work looks simpler than it is, not because anyone lied, but because key voices never got heard.
Why team coordination matters more at scale
Coordination ranks as one of the biggest challenges in large-scale software projects, particularly with complex codebases and multiple teams working simultaneously. As organisations scale, coordination problems increase:
- Dependencies multiply across teams. What used to be a conversation between two people in the same room now requires checking another team's roadmap, finding out who owns a component, and waiting for their sprint to align with yours.
- Handoffs increase between specialists. A feature that one full-stack developer could build now needs a frontend specialist, a backend specialist, a platform engineer, and a data analyst - each working on different schedules with different priorities.
- The margin for error shrinks. When you're coordinating work across five teams instead of one, a single miscommunication or missed dependency can block multiple teams at once, not just delay one work item.
- Assumptions travel further from their source. The product manager who spoke to the customer isn't in the room when the backend developer makes a technical decision. The context that shaped the original requirement gets lost through layers of handoffs and documentation.
Estimation sessions are often the only moment when everyone involved in delivering work actually talks about it before starting. Treating that time as a box-checking exercise to produce velocity data is one of the biggest mistake you could make as a team.
When estimates protect plans instead of revealing risks
Let's look at a familiar scenario. A team commits to eight features based on historical velocity. Three sprints in, two features ship and the rest need another month. Marketing campaigns get delayed. Customer pilots get postponed. Executive presentations need rewriting.
The team "missed commitment," so stakeholders lose confidence.
Next quarter, product managers add extra weeks to every timeline just to be safe. Engineering leaders give longer forecasts they know they can beat rather than their honest best estimate. Everyone protects themselves, the system slows down, trust erodes further.
Now, step back - why did the team commit to eight features in the first place? Usually because velocity suggested they could complete them.
The velocity number reflected what they'd delivered in the past. What it didn't reflect was whether those sprints had taught them anything, whether dependencies were worsening, whether technical debt was compounding, or whether the work ahead resembled the work behind.
Why velocity numbers mislead
Velocity treats delivery capacity as stable when it's dynamic.
Teams get faster as they remove friction and slower as complexity increases. Last sprint's number is already outdated, yet sprint planning sessions treat it as a reliable forecast.
Consider what velocity cannot tell you:
- Whether the team learned from previous mistakes
- Whether technical debt is slowing new work
- Whether dependencies have become more complex
- Whether the upcoming work requires unfamiliar technology
- Whether key team members will be available
Better agile estimation techniques won't fix coordination problems. But teams can fix coordination problems if they treat coordination itself as work that deserves attention.
Why fixing coordination problems matters for estimation
Teams that have messy estimation sessions usually know exactly what's wrong.
Someone will say it in standup: "We should really refine stories before planning."
Another person mentions it in Slack: "We need to check dependencies earlier."
It even comes up in the retrospective: "Our estimates are all over the place because we don't understand the work."
The insights are there. What's missing is follow-through.
Look at your last three retrospectives. How many action items got completed before the next one?
The average completion rate for retro action items sits around 0.33% - teams basically complete almost none of them. And that's mainly because the improvement actions exist outside the system that schedules work.
During retrospectives, teams identify real problems:
- "Our estimation sessions run too long because we don't refine stories beforehand"
- "We keep getting surprised by infrastructure work that's not in our backlog"
- "We never follow up on the spikes we create"
- "Dependencies block us mid-sprint because we didn't check capacity with other teams"
All true. All important. Then the retrospective ends, everyone returns to their sprint board, and those insights have nowhere to go.
The backlog contains features. The sprint contains stories. And improvement work lives in meeting notes, if anywhere. So it doesn't compete for capacity, doesn't get assigned an owner, doesn't get tracked, and doesn't get done.
How to make improvement work visible
Usage data from Easy Agile TeamRhythm showed teams completing only 40-50% of their retrospective action items. After releasing features to surface and track incomplete actions, completion rates jumped to 65%.
The mechanism was simple:
- Convert retrospective insights into Jira work items
- Give each one an owner
- Slot them into upcoming sprints like any other work
- Make incomplete action items from the previous retros more visible
When teams actually complete their retrospective actions, estimation gets better without changing the estimation technique. Stories get refined before planning, so there's less guesswork. Dependencies get checked earlier, so there are fewer surprises. The team builds shared understanding over time, so the spreads in planning poker get narrower and the discussions get shorter.
As you can see, this is a ripple effect.
Coordination problems compound when ignored, but they also improve when treated as real work.
A team that never fixes its planning problems will have messy estimation sessions next quarter, and the quarter after that. A team that deliberately improves coordination will gradually need less time to reach better software team alignment and their estimates will become more reliable as a byproduct.
What this means for tools and practice
Most planning tools were built to manage tasks, not support the conversations that help teams coordinate around those tasks. The challenge now is making coordination visible and trackable in the same place where delivery work happens.
Easy Agile TeamRhythm keeps coordination work alongside delivery work.
✅ User Story Map shows how work connects to goals, making sequencing a shared discussion instead of someone's private spreadsheet.
✅ Planning poker happens inside the Jira issue, where everyone sees the same acceptance criteria and attachments - so the spread of estimates becomes a trigger for conversation, not a number to agree on.
✅ Retrospective actions convert directly into backlog items that get added into upcoming sprints, so improvement work gets the attention it deserves.
The stakes for getting this right are rising. Atlassian's push towards AI assistance means your planning documents will be read by more people and processed by more systems. When Rovo searches your Jira instance, it surfaces whatever you've written - clear goals and explicit dependencies, or vague titles and hidden assumptions.
A fuzzy sprint goal doesn't just confuse your team. It confuses the dozen people across three time zones reading your board asynchronously, the automation trying to identify relevant work, the AI assistant trying to generate status updates, and the stakeholders trying to understand progress.
Where this leads
The teams that succeed over the next few years won't be the ones with the most sophisticated agile estimation techniques or the highest velocity scores.
They'll be teams where planning poker uncovers risks instead of producing commitments. Where retrospectives generate work items instead of wishful thinking. Where coordination shows up in Jira instead of getting discussed in conversations that disappear.
They'll be teams that figured out estimation was never about the numbers. It was always about getting everyone pointed in the same direction, with their eyes open, before the work starts.
The number is just what gets written down. The conversation that takes the team to the number is where the real work lies.
 Agile Best Practice
Velocity Starts with Alignment
Velocity is a simple idea that’s often misunderstood. It measures how much work a team has completed in a sprint, and over time, it can show an average that helps teams plan what’s realistic for the next one. It’s a useful guide, but it isn't a goal in itself.
Some teams treat velocity like a target or a competition (and some are pushed to). They might fall into a trap of comparing their velocity to other teams, and try to push it higher, hoping it will prove that they’re getting faster. But velocity is not a budget, a forecast, or a speedometer and there isn't any benefit in looking at it that way. So rather than looking at velocity as a scoreboard of individual performance, we should consider it a reflection of progress made by a team working together.
Used well, velocity helps a team understand their delivery rhythm and make sustainable plans. Used poorly, it can create pressure, encourage over-commitment, and hide the very problems it’s meant to reveal.
That’s why alignment matters. When a team plans together, estimates together, and agrees on what success looks like, velocity becomes a sign of steady progress rather than a race for points.
Where real pressure comes in: leadership, metrics and expectations
Team velocity often becomes a target not because the team wants it that way, but because leadership or stakeholders push for higher numbers. Community threads and agile commentators repeatedly flag this.
1. Metric as performance tool rather than guide
In “Is Measuring Velocity in Scrum Good or Bad for Your Team?” our partners at CPrime warn of risks to team morale and performance when teams are compared based on velocity. When velocity is viewed as proof of output, pressures mount to inflate estimates or cram more work. More doesn't always equal better.
2. Unrealistic demands from above
Teams feel the squeeze when leaders look at velocity charts and ask “Why can’t we do more?”. Often, this shifts the burden to the team working faster, rather than ensuring there are clear goals to guide the planning process. In practice, these demands lead to corners being cut, assumptions going unchallenged, and real issues being hidden. After all, increasing velocity by 20% could be as simple as inflating estimates by 25%.
3. Misuse of comparisons and individual “velocity”
Some leaders want to pit teams against each other or measure individuals. According to the Agile Alliance, “only the aggregate velocity of the team matters, and the phrase ‘individual velocity’ is meaningless.” That misuse leads to resentment and burnout, where team members are more inclined to find ways to game the metrics, and retreat into a silo rather than collaborate.
4. Volatility triggers pressure, not insight
When velocity swings — up or down — poor leadership will respond with a mandate rather than inquiry. But those swings often signal real issues that prevent work from progressing: unclear user stories, poorly mapped dependencies, or overcommitment. All of these issues can be addressed with better planning; treating them as failures rather than clues can only make things worse.
What alignment really means
Alignment is a shared understanding that connects planning, estimation, and delivery. When a team is aligned, everyone sees the same goal, understands what it will take to achieve it, and recognises where the risks lie.
But if alignment were easy, misalignment wouldn’t show up so often. You can usually spot it when planning feels tense, with people talking past each other, or it goes completely quiet as no one feels confident to speak up. Estimates vary wildly, or work shifts mid-sprint because the team never agreed on what “done” really meant. All of this points to the same issue: the team doesn’t yet share a clear, common understanding of the work.
True alignment happens when planning and estimation happen together. Teams discuss what matters, how complex it is, and how confident they feel. Product owners bring the context, engineers share the technical view, and designers help surface dependencies. Together they build a realistic plan that connects the work to the outcome.
Once this shared view exists, estimates and velocity reflect understanding rather than guesswork. The team can plan with more confidence and adapt with less stress. Alignment is what yields the real progress.
How alignment is built in practice
Alignment doesn’t happen by accident. It’s shaped through open conversations, shared visibility, and habits that keep everyone working from the same plan. Tools support this, but alignment comes from how people use them together.
1. Start planning from shared priorities
Begin with what matters most. Sprint goals or high-level initiatives help anchor the discussion before you get into the detail of breaking down tasks. When everyone sees how each story connects to an outcome, decisions stay grounded in value and you reduce the opportunity for strong opinions to have undue influence.
2. Estimate as a team, not as individuals
The benefit of estimation comes from the conversation and the opportunity to share understanding. When people share their view of effort and complexity, hidden assumptions can surface early and be clarified. The Planning Poker feature in TeamRhythm makes this easy to run inside Jira, keeping the discussion focused on the work itself.
3. Keep priorities visible and current
Goals that can’t be seen are quickly forgotten, but a live view of the sprint in Jira helps everyone see what’s next, what’s at risk, and what’s already done.
With TeamRhythm, teams can set clear goals for each sprint or iteration and see how every story connects to those goals. User stories sit under epics, showing at a glance how work is grouped and how each piece contributes to the bigger picture. The story map view keeps this visible to everyone, without adding extra admin.
4. Revisit alignment often
Alignment isn’t something you agree on once and then take for granted; it needs small, regular check-ins. The daily stand-up is a great time to do this. Use stand-ups to confirm what still matters most, discuss any new dependencies that have surfaced, and make quick adjustments before things slow down.
When you keep alignment visible in this way, it becomes part of how you work rather than another meeting to run. The plan stays shared, delivery feels steadier, and progress is easier to trust.
Turning alignment into confidence
Alignment is about giving people the clarity and trust they need to work as a team with confidence. When the whole team understands what matters, what’s achievable, and how their work contributes, they can move forward with focus instead of hesitation.
That shared understanding encourages open conversations that offer an opportunity for early problem-solving, as well as flexibility when things change. People feel comfortable speaking up because they know their perspective helps shape the outcome. Those are the building blocks of steady progress.
With that kind of clarity, velocity becomes a reflection of how well the team works together rather than how quickly they move. The numbers stop creating pressure and start showing evidence of reliable delivery.
Confident teams make thoughtful decisions, adapt to change without losing direction, and keep delivering work that truly matters. That’s what alignment makes possible.
 Product
Learn together. Deliver more with the Easy Agile Learning Hub
Shared understanding lifts team performance. When people see the same picture, decisions get easier and delivery feels smoother. The Easy Agile Learning Hub gives you free, on demand courses that help your team run stronger ceremonies and get more value from your toolset.
Why shared learning matters
Most teams know the basics of agile. The challenge is turning that knowledge into simple routines that work in your context. Focused learning aligns product, delivery, design, and leadership on what good looks like in the next ceremony.
Shared learning also reduces time spent debating terms or tools. When everyone uses the same language, you avoid friction and protect time for real work. It is a small change with a big upside for planning, predictability, and morale.
Designed for busy teams
The Learning Hub is built for quick wins. Courses are short, friendly, and easy to follow for readers from any language background. Each lesson focuses on one idea, then shows how to apply it in a real setting. You can learn on any device, at any time, and you can repeat lessons when you need a refresher.
What is inside the Learning Hub
You’ll find streams of learning that help support teams and each other. First, courses on ceremonies and everyday practices. Second, guidance on getting more from Easy Agile apps inside your Atlassian stack. Together they help you turn good intentions into stable habits.
Goal setting: Clarity → Action → Alignment
Learn a method agnostic way to set goals across teams of teams. Define shared outcomes, make goals actionable, and keep alignment through delivery so effort drives real results, not rework. you'll practise inside Easy Agile Programs for Jira, which keeps your goals close to plans and progress. For product managers and programme leads, this is the best first step. Watch the 30 second preview, then start with the program planning path.
Build shared understanding of priorities: Easy Agile TeamRhythm
Use TeamRhythm's User Story Map inside Jira to align your team, prioritise visually, and plan by customer value. See the work as a story from the customer view, not a flat list of tickets. This helps everyone spot gaps, slice scope, and agree the next thin release. Designers, analysts, and product owners will feel at home here. Watch the 30 second preview, then follow the user story mapping path.
From retro to action: how Easy Agile TeamRhythm helps your team follow through
Capture feedback throughout the sprint, assign and track owned action items, spot recurring themes, fix root causes, and close the loop on team improvement. Improvements live where work lives, so they do not fade after the meeting. Delivery leads and engineers who want visible follow through should begin here. Watch the 30 second preview, then take the retrospectives path.
From learning to better outcomes: How teams get started
A simple entry point is to pair learning with an upcoming ceremony. For example, take the TeamRhythm story mapping course on Monday, then use the map to shape backlog items on Tuesday. Ask each person to call out the slice of customer value they think is most important, then compare what the map shows.
For programme level planning, book time with the goal setting course in Easy Agile Programs. Start by agreeing a few shared outcomes, then test them against real constraints and real teams. Use the course prompts to check if each goal is clear, actionable, and still aligned once you connect it to delivery plans.
To improve how you close the loop, schedule the retro to action course before your next review. Capture feedback during the sprint, assign owners in the session, and track progress in the same place you track work. In the next retro, look for themes, celebrate what improved, and decide on the next small change.
Built for every role
Product managers and owners will find ways to shape a clear backlog, tell the story behind priorities, and connect outcomes to customer value. Delivery leads and engineers will find tools to reduce carryover, improve estimation, and keep work visible. Designers and analysts will learn how to bring insights into ceremonies so decisions are well informed. Leaders will see how to sponsor healthy habits and remove blockers without micromanagement.
Inclusive and practical by design
The Hub avoids jargon and long lectures. It uses plain language and calm pacing so people can follow along with confidence. Examples reflect common team scenarios. You'll not be told that there is one right way. Instead, you get simple patterns you can adapt to your context.
Zero cost, real impact
Budget should never block better teamwork. The Learning Hub is free for the Easy Agile community. You do not need to be a power user of our apps to benefit. If you are exploring Easy Agile, it is a helpful way to see how our approach supports clear, collaborative planning in Jira. If you already use our apps, the Hub helps you get more from your investment by showing practical ways to apply features in real work.
Invite the whole team
Shared learning works best when everyone has access. Invite product, delivery, design, and leadership to join you. Even if some colleagues are not active in Easy Agile tools today, they'll benefit from the guidance on ceremonies and team practice. A common foundation pays off in every meeting and release.
Simple next steps
Registration takes a few minutes. Pick a course that matches your next ceremony or planning horizon. Share one tip in chat and agree to try it as a team. After the session, ask two quick questions. What felt better. What will we repeat next time. This steady rhythm turns ideas into lasting habits.
Ready when you are
The Easy Agile Learning Hub is here to help you learn, align, and deliver with confidence. It respects your time and your context. It turns shared learning into shared results.
Explore the Learning Hub today. If you prefer direct action, start learning for free and bring a colleague with you. Your next ceremony can be clearer, calmer, and more effective with a small step from the Hub.
 Agile Best Practice
We Simplified Our OKRs - and Got Better Strategy, Alignment, and Execution
TL;DR
- Simplified OKRs to two levels for clarity and focus.
- Introduced monthly confidence scoring to catch issues early.
- Strengthened cross-team collaboration and ownership.
- Replaced rigid planning with flexible roadmaps.
- How Easy Agile Programs helps teams align daily work with strategic goals.
- FAQs to help you improve your own OKR process.
At Easy Agile, we’ve spent a lot of time thinking about how to structure, align, and apply Objectives and Key Results (OKRs) in a way that actually works.
When we first introduced OKRs, our goal was to bring more strategic clarity and better alignment. But as our company grew, so did the complexity. Teams found themselves trying to work through vague objectives, siloed collaboration, and a rigid process that made it hard to adapt quickly when things changed.
Over time, through reflection and continuous feedback, we realised that great OKRs don’t just need to be clear. They also need a process that’s flexible and practical enough to help teams focus and deliver in real time.
If your organisation is running into similar issues, our journey might help you find a better path to strategy alignment.
Why We Had to Rethink Our OKRs
Our original OKR setup had company, function, and team-level objectives. While this seemed like a thorough structure, it ended up creating more complexity than clarity.
Many teams told us they felt overwhelmed by how many objectives they had to manage. Often, these objectives didn’t feel clearly tied to the overall direction of the company, which made it hard to prioritise or stay motivated.
Collaboration between teams also suffered. Important dependencies weren’t always spotted early, which led to mid-quarter issues and a lot of reactive work. On top of that, our quarterly planning cycle was too rigid. It didn’t give us enough room to pause, learn from what was happening, or shift priorities when something changed.
One of the biggest challenges was the way we tracked progress. Without a shared approach to scoring, it was hard to tell how things were really going. Teams weren’t always sure whether they were on track or falling behind, and by the time we found out, it was often too late to course correct.
From our feedback sessions, we heard some consistent problems:
- OKRs became a checkbox activity. Teams felt like they had to create objectives every quarter, but didn’t see them as useful for real decision-making.
- High-level company OKRs felt too abstract. It wasn’t clear how day-to-day work connected to broader goals.
- Cross-team collaboration was difficult. Dependencies surfaced late, which made it harder to stay aligned and meet deadlines.
- The planning cadence was too inflexible. We weren’t creating space for reflection or change during the quarter.
- Scoring was inconsistent. With no shared method for reviewing progress, we often missed early signs that something wasn’t working.
All of this made it clear: we didn’t need to adjust our OKRs; we needed to completely rethink them.
Our New OKR System: Before and After
Rather than making small tweaks, we decided to completely redesign our OKR framework. We simplified it and built in more flexibility. We wanted fewer OKRs, better collaboration, and a stronger link between strategy and delivery.
Here’s a snapshot of what changed:
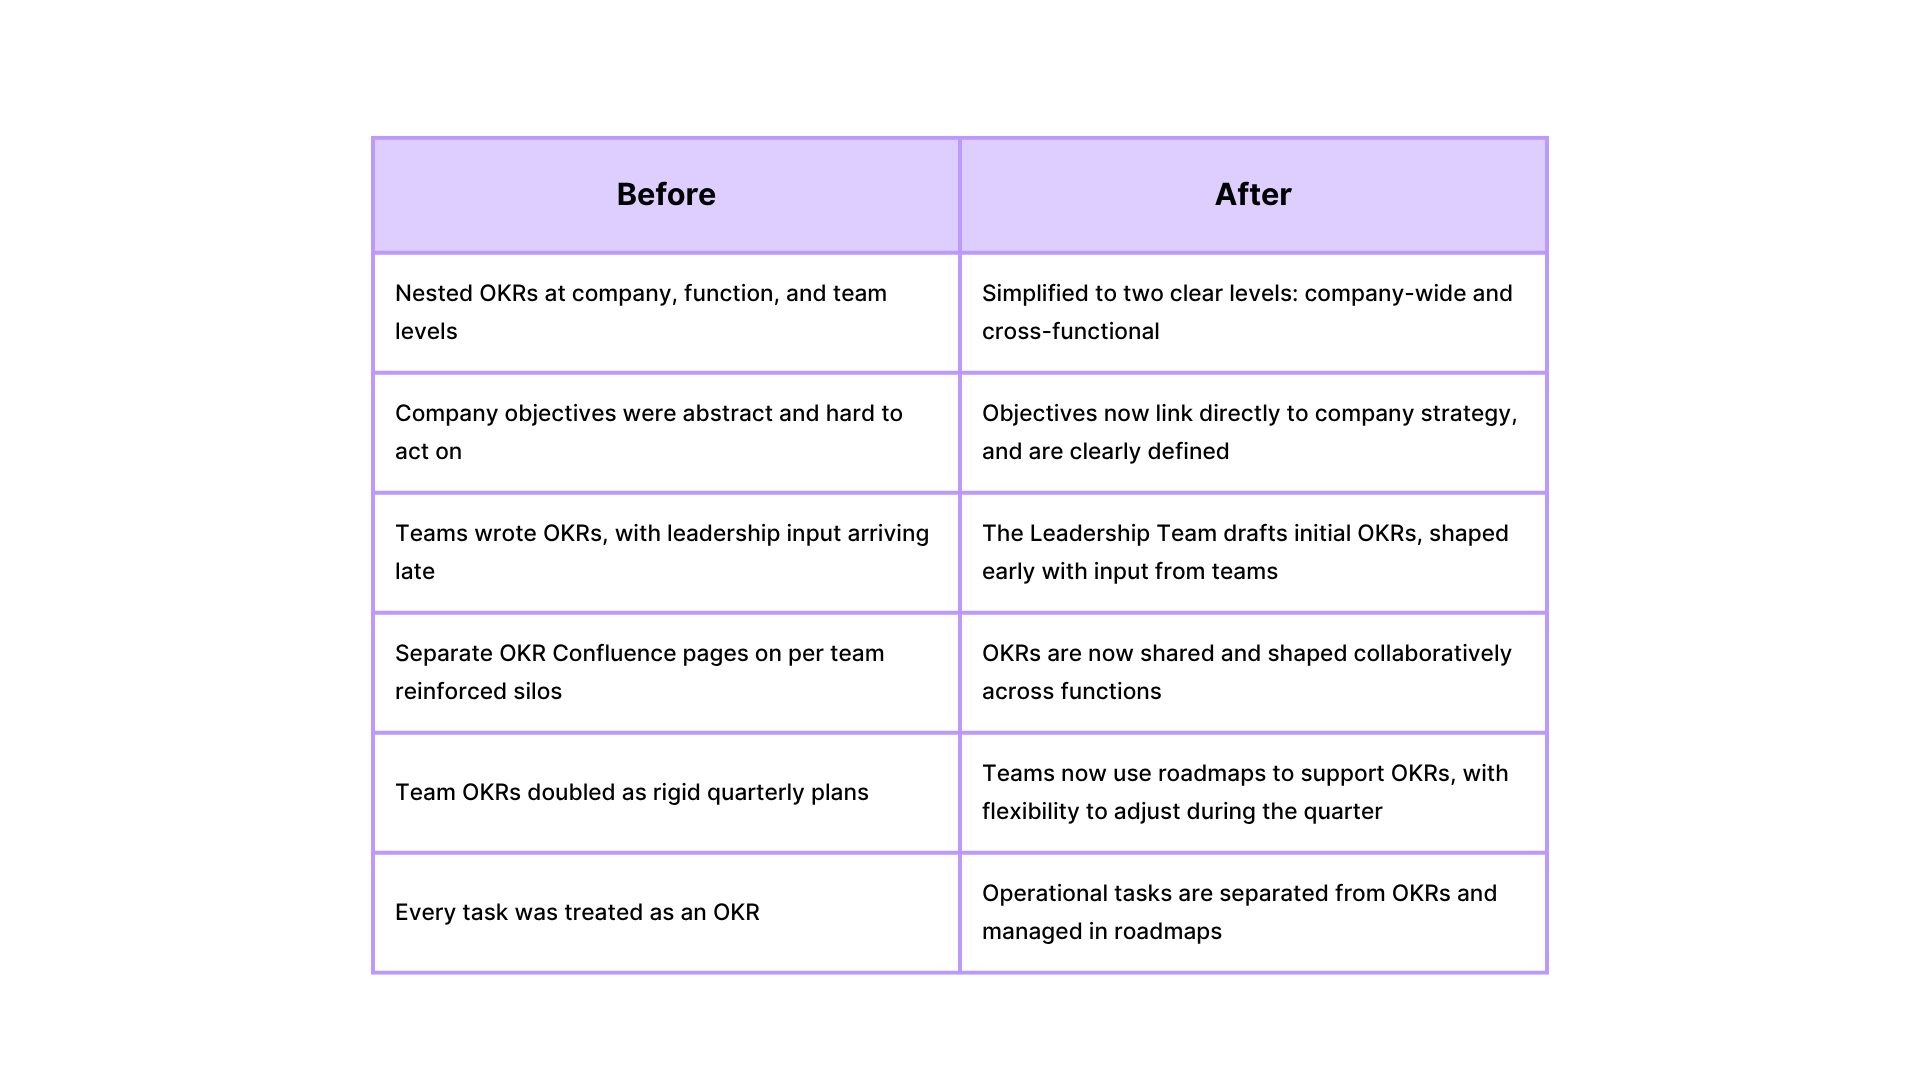
Core Principles Guiding Our New Framework
This wasn’t just a structural update. It was a mindset shift. We redefined the role OKRs should play in our company and focused on what our teams actually need to do their best work: alignment, focus, and the ability to learn and adapt.
Value Over Volume
We aim for fewer, more meaningful objectives. This helps teams stay focused on what really matters without feeling overwhelmed.
Strategic Alignment
Every objective now connects clearly to a company priority. This makes it easier for teams to see how their work contributes to broader goals.
Cross-Functional Collaboration
OKRs are designed to be shared across teams. We make sure that responsibilities and dependencies are visible and co-owned.
Learning and Adaptability
We use regular check-ins, not just end-of-quarter reviews, to reflect on what’s working, spot risks, and adjust as we go.
Scoring OKRs: A More Consistent Rhythm for Progress Tracking
To improve how we track progress, we introduced a unified 1–5 confidence scoring system across the company.
Every month, teams rate their confidence in each Key Result - not just whether it’s complete, but whether we’re on track to achieve the intended outcome by the end of the quarter.
Here’s how it works:
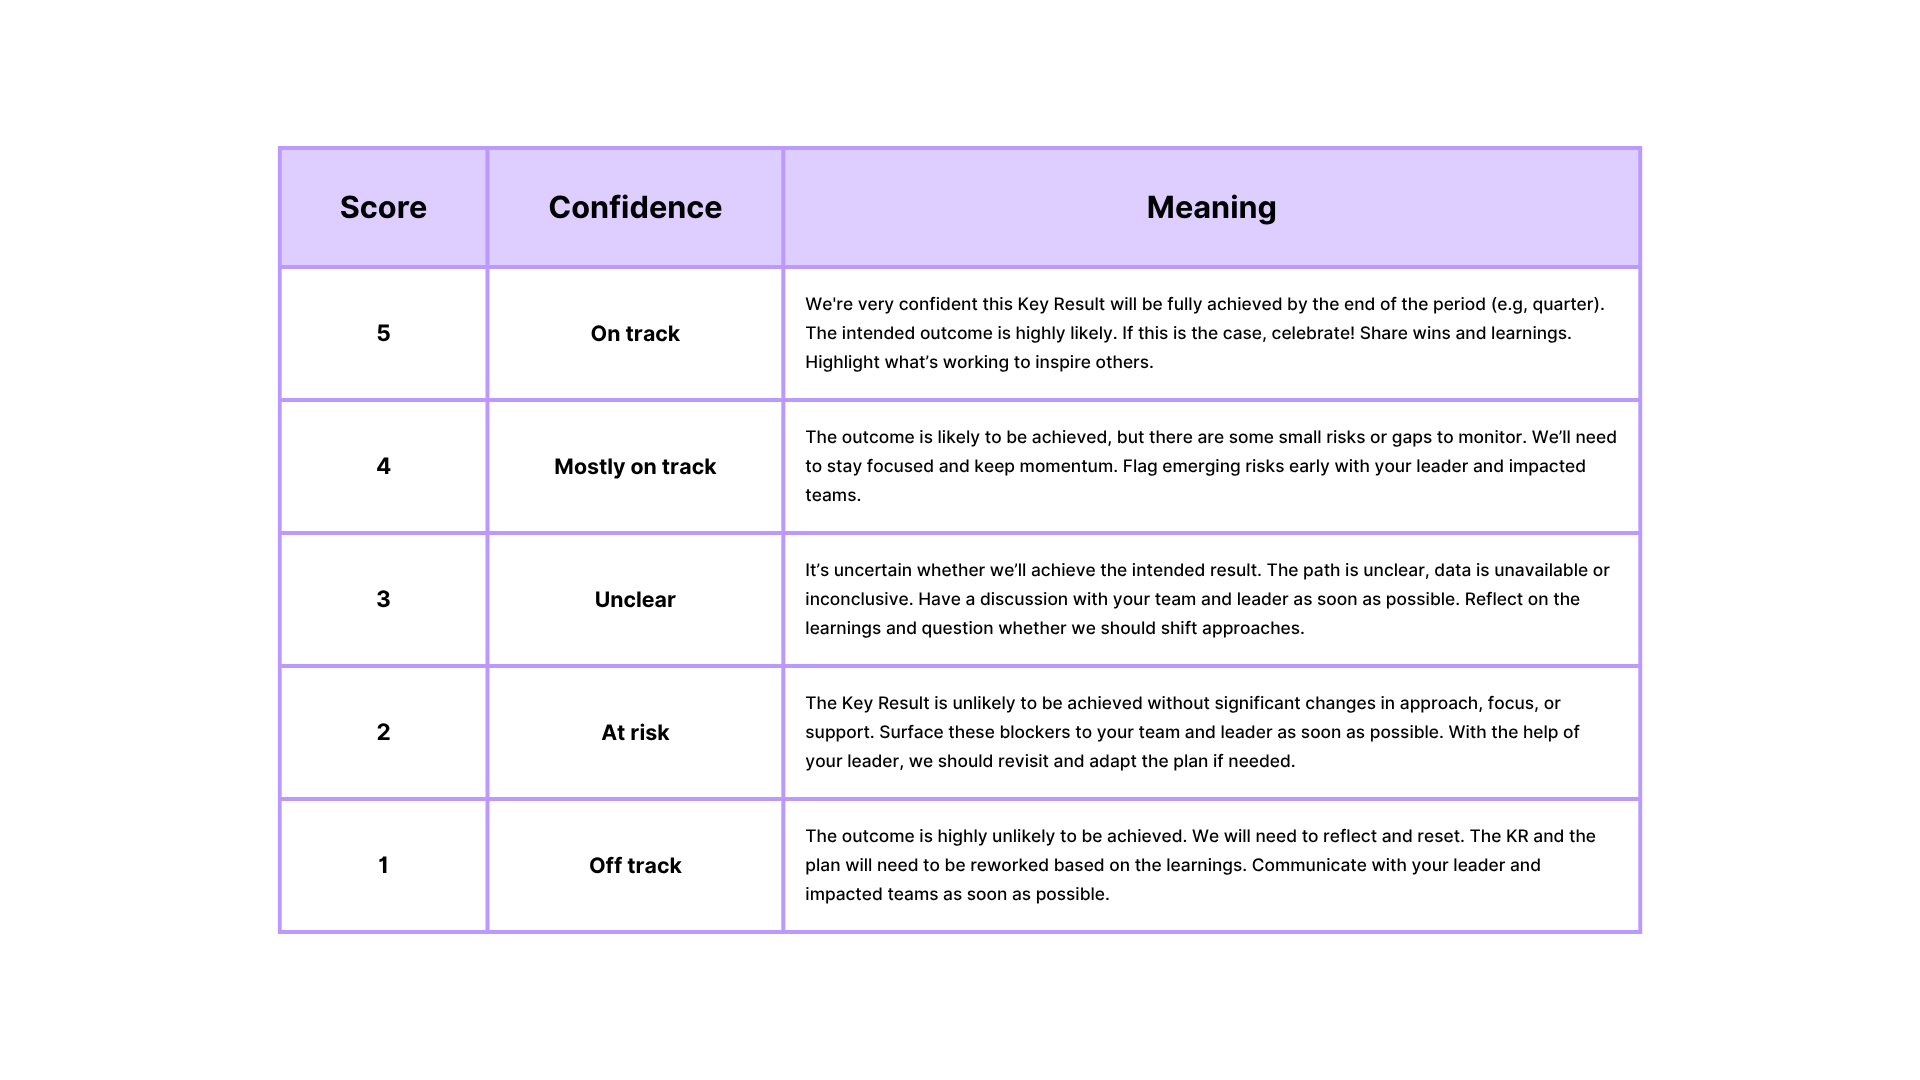
This shared model has helped create a common language for progress, better conversations in our check-ins about what’s really happening, and proactive course corrections.
Early Wins and What’s Next
We knew this shift would take time. But even in the early stages, we’re seeing positive changes across the business. These aren’t just surface-level changes; they’re shifts in how teams think about impact, alignment, and shared responsibility.
Here’s what has stood out so far:
- Stronger strategic clarity. Teams now see how their work links to broader goals. This clarity has unlocked better prioritisation and stronger engagement.
- Improved cross-functional planning. We’re catching dependencies earlier, which means fewer mid-quarter surprises and more consistent momentum across shared initiatives.
- More meaningful check-ins. Our monthly reviews are no longer just updates. They’re real opportunities to reflect, course-correct, and celebrate progress - especially when confidence scores trend upward.
Of course, we’re not done yet. The next iteration will focus on simplifying how dependencies are captured, giving teams better support in shaping roadmaps, and reinforcing consistent practices around scoring.
How Easy Agile Programs Can Help Teams Operationalise OKRs
Once we have a clearer OKR structure, we need the right tools to support it. Easy Agile Programs helps teams turn strategy into execution that keeps OKRs visible, flexible, and connected to delivery.
Visual Goal Alignment
Easy Agile Programs makes it easy to connect team roadmaps to strategic OKRs. This helps everyone understand how their work supports the big picture - without needing to cross-reference multiple tools.
Better Collaboration and Transparency
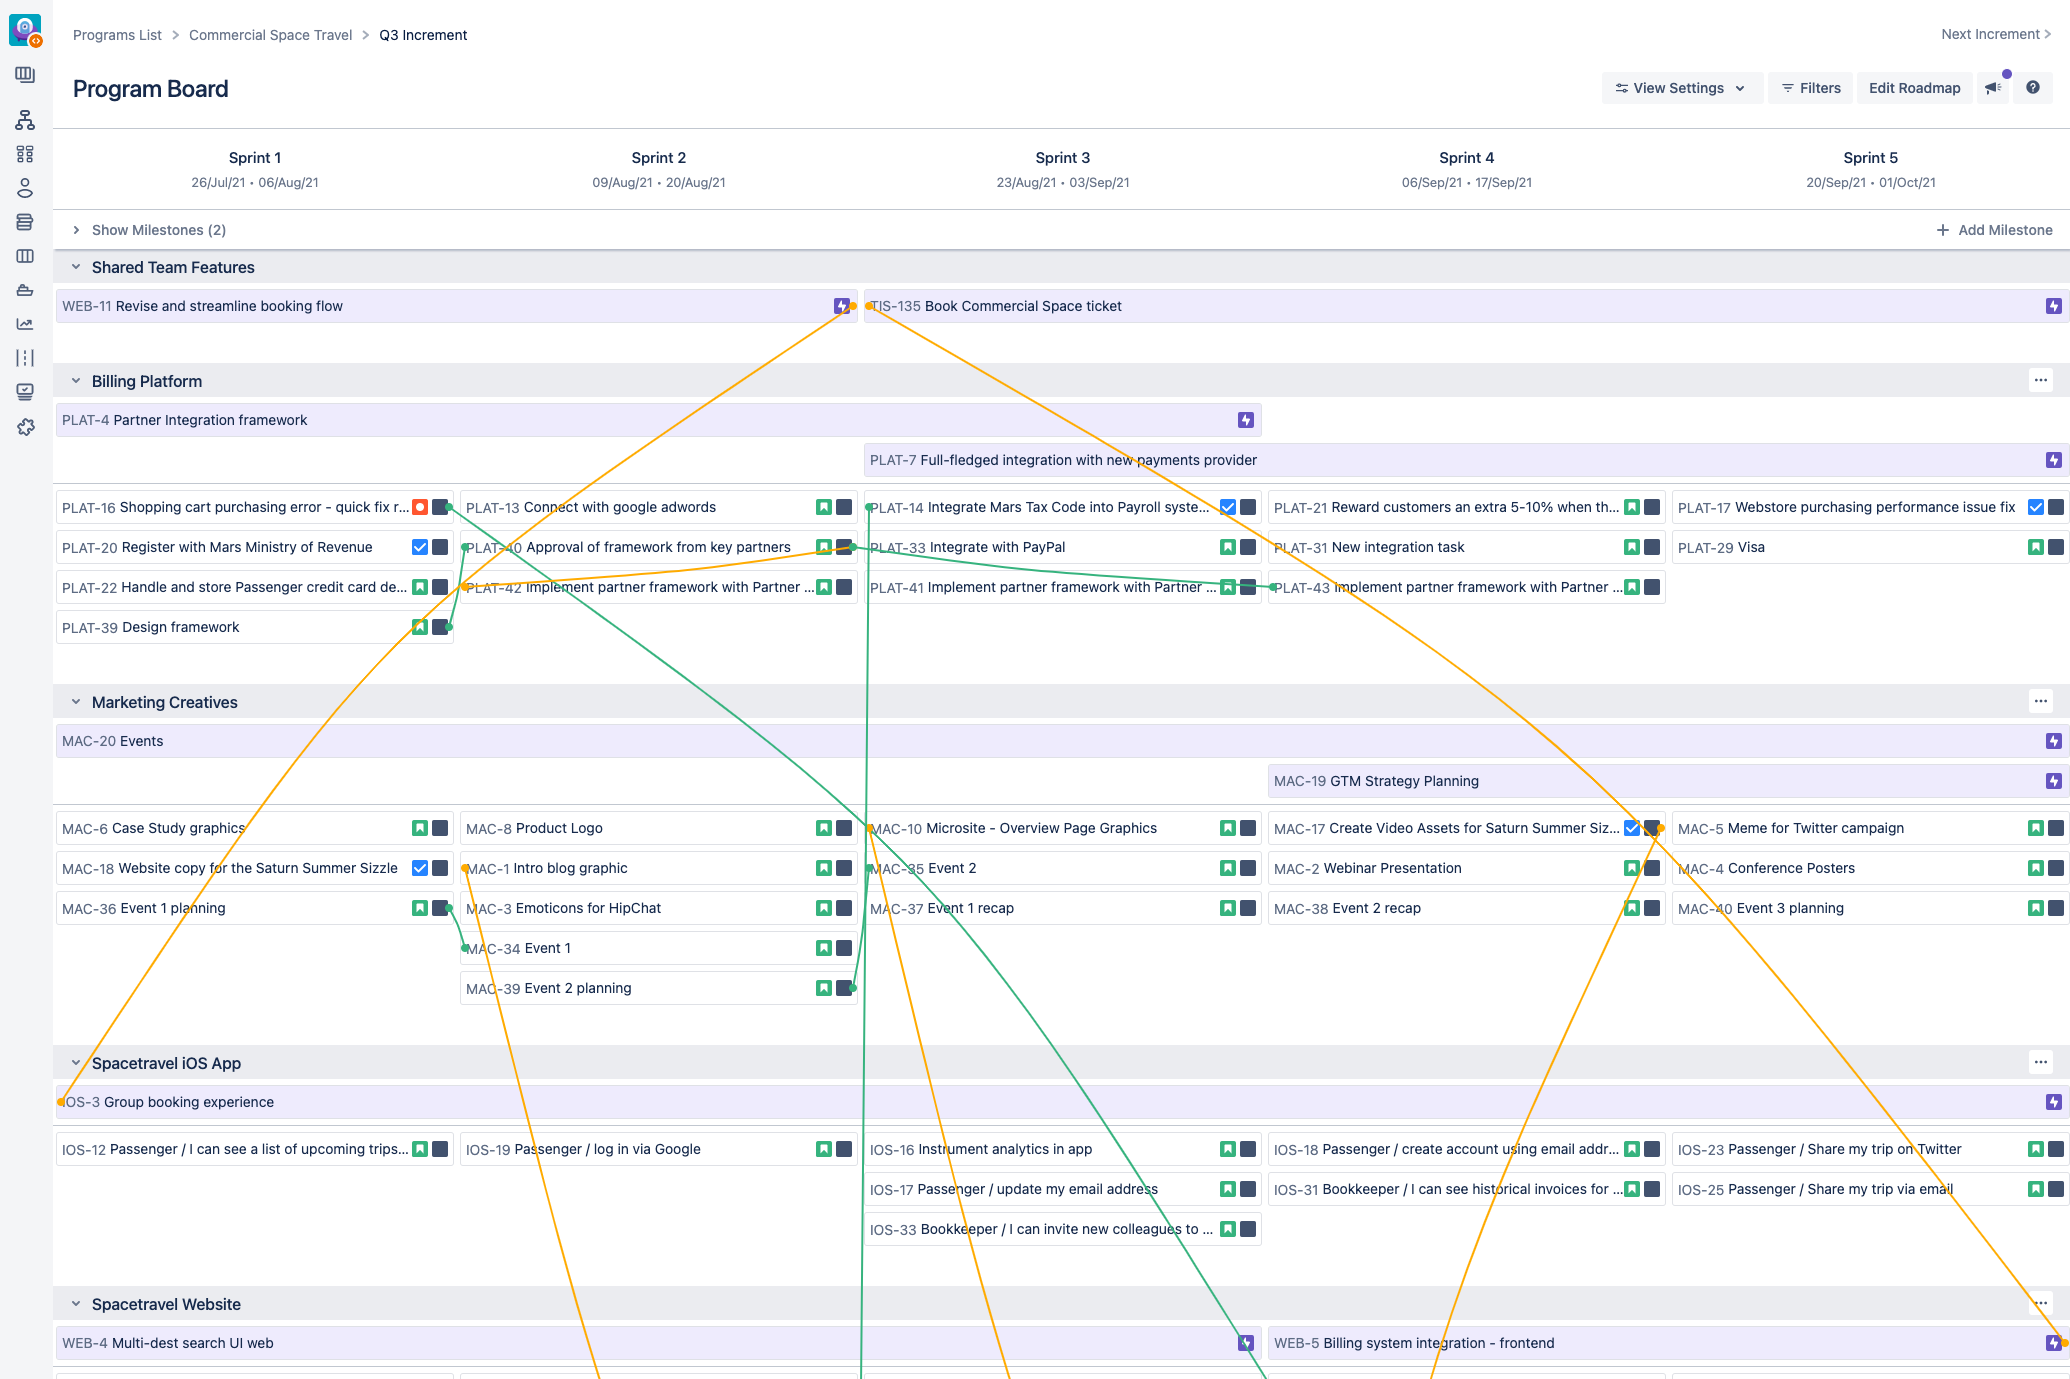
With the Dependency Report in Easy Agile Programs, teams can visualise how their work intersects with others’ across the organisation. This early visibility helps surface potential blockers and makes it easier to coordinate shared timelines before risks turn into issues.

Strategic Prioritisation
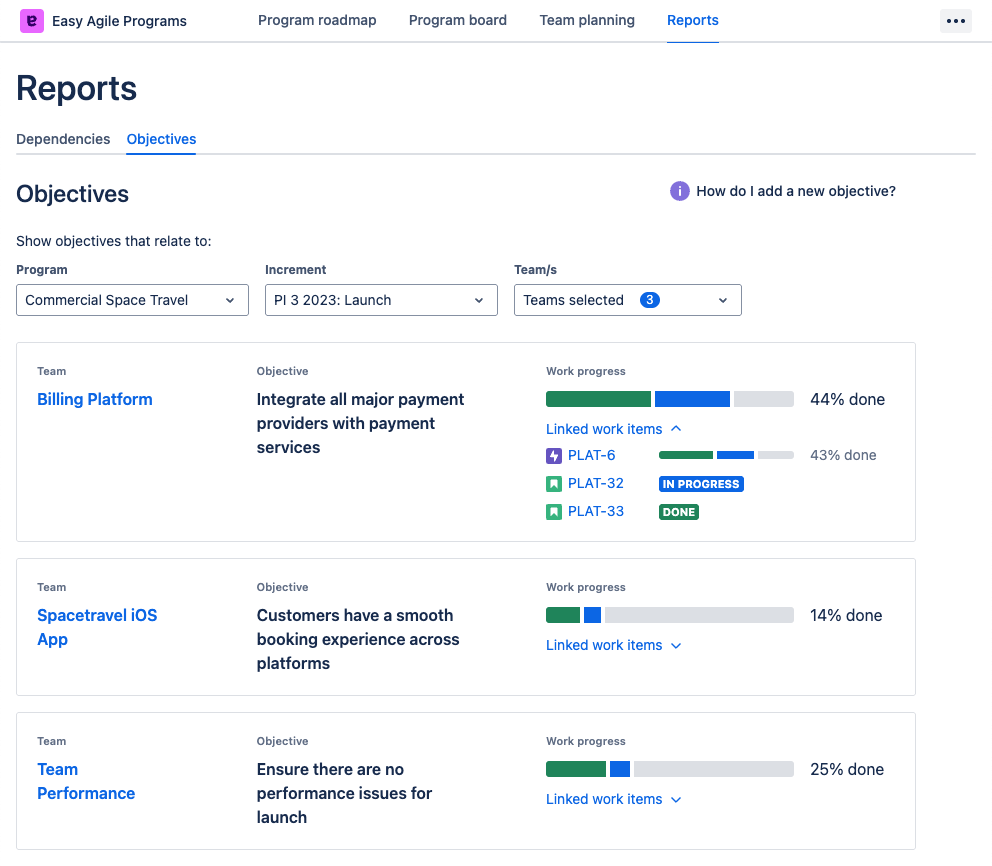
The Objectives Report gives teams a real-time view of which objectives are in play, who’s contributing, and how much progress has been made. It helps teams stay focused on outcomes, not just activity - making it easier to course correct or re-align when needed.
OKRs Are Only as Strong as the System Behind Them
We don’t believe in one-size-fits-all frameworks. What we’ve built is a system that works for our size, our rhythm, and our teams.
It’s not about having perfect OKRs. It’s about having the right environment around them - a rhythm of planning and reflection, a shared language of progress, and clear alignment between strategy and delivery.
And getting that environment right means using tools that could support the way we actually work.
Easy Agile Programs can help with that. It gives teams the structure and visibility to turn strategic goals into coordinated execution. It helps bring teams into the planning process earlier, surface risks sooner, and keep OKRs connected to real work throughout the quarter - not just at the start and end.
OKRs don’t live in documents. They live in decisions and in the day-to-day choices teams make about where to focus. Having a tool that keeps those choices visible, flexible, and aligned will make a real difference.
We’re still learning and refining. But this shift has already helped us work with more clarity, more collaboration, and more confidence in where we’re heading.
If you’re running into similar challenges with your OKRs, we’ve been there. We’d love to share more about what’s worked for us - and hear how others are building systems that turn goals into real progress.
FAQs: Implementing Effective OKRs
How does Easy Agile establish cross-functional OKRs?
The Leadership Team drafts initial cross-functional OKRs aligned to strategic priorities, actively incorporating detailed input from teams to ensure practicality and alignment.
Do teams maintain autonomy within this OKR framework?
Yes, teams have full autonomy in determining how they operationalise OKRs through their individual roadmaps, balancing clear strategic direction with operational flexibility.
How do teams understand their contributions to OKRs?
Easy Agile Programs explicitly highlights collaborating teams and relevant initiatives, providing clarity on responsibilities and proactively managing dependencies.
What does ownership of a cross-functional OKR entail?
Ownership involves strategic coordination, proactive communication, risk management, and progress tracking—not necessarily performing every task directly.
How are routine operational tasks managed?
Operational tasks (“Keep The Lights On” activities) are tracked separately within team roadmaps, ensuring clear strategic focus without operational disruption.
How does Easy Agile handle off-track OKRs?
Our simplified 1-5 scoring system proactively identifies risks, enabling teams to quickly intervene and make agile adjustments.
 Agile Best Practice
The Hidden Costs of Agile Anti-Patterns in Team Collaboration
TL;DR
Anti-patterns in agile feel familiar, but often quietly undermine progress. In this guide, we explore five common collaboration traps: large user stories, forgotten retro actions, superficial estimation, premature "done" labels, and ceremonial agility. You'll learn how to recognise, understand, and experiment your way out of them.
The Comfort Trap: Why Familiar Agile Habits Hold Teams Back
In agile, anti-patterns don’t announce themselves. They slip in quietly, posing as good practice, often endorsed by experience or habit. Over time, they become the default - until velocity stalls, engagement dips, and retros feel like re-runs.
In our conversations with seasoned coaches and practitioners across finance, government, consumer tech, and consultancy, we realised one thing - anti-patterns aren’t just a team-level concern. They signal deeper structural misalignments in how organisations think about work, feedback, and change.
To protect the privacy of our interviewees, we’ve anonymised company names and individual identities.
Let’s unpack a few of the most pervasive anti-patterns hiding in plain sight, and how to shift them without disrupting momentum.
1. The Giant User Story Illusion
Large User Stories: Oversized tasks that delay feedback and blur team accountability.
"It felt faster to define everything up front. Until we got stuck." - Product Manager, global consumer organisation
Large user stories promise simplicity: one place, one discussion, a broad view stakeholders can get behind. But when delivery starts, the cracks widen:
- Estimations become guesswork.
- Feedback loops stretch.
- Individual contribution becomes unclear.
In many teams, the difficulty isn’t about size alone - it’s about uncertainty. Stories that span multiple behaviours or outcomes often hide assumptions, making them harder to discuss, estimate, or split.
Symptoms
- Stories span multiple sprints.
- Teams lose clarity on progress and ownership.
- Estimation sessions are vague or rushed.
Root Causes
- Pressure to satisfy stakeholder demands quickly.
- Overconfidence in early solution design.
- Lack of shared criteria for 'ready to build'.
Remedy
Break stories down by effort, known risks, or team confidence. One team created their own estimation matrix based on effort, complexity, and familiarity—grounding pointing in delivery, not abstraction.
See also: The Ultimate Guide to User Story Mapping
2. Retro Amnesia: Action Items with No Memory
Incomplete Retro Actions: Items raised in retrospectives that quietly disappear, losing learning and team trust.
"We come up with great ideas in retros, but they disappear." - Agility Lead, multinational financial institution
When teams can’t see which actions carried forward, improvement becomes accidental. One coach described manually collecting and prioritising past action items in a Notepad file - because nothing in their tooling surfaced incomplete actions by default.
Worse still, valuable decisions get revisited unnecessarily. Teams forget what they tried and why.
Symptoms
- Recurring issues in retros.
- Incomplete actions vanish from view.
- Team energy for change drops over time.
Root Causes
- Retros run out of time before reviewing past items.
- No tooling or habit for tracking open actions.
- Actions lack owners or timeframes.
Remedy
Surface incomplete actions in one place and track progress over time. Revisit context: what triggered the decision? What outcome did we expect?=
3. Estimation Theatre: When Story Points Become Currency
Story Point Anchoring: The habit of assigning consistent points to avoid conflict, not to clarify effort.
"The team got used to anchoring around threes. Everything became a three." - Agile Coach, public sector agency
Story points should guide shared understanding, and not become a measure of performance or predictability. But many teams fall into habits:
- Anchoring to previous estimates.
- Avoiding conflict by picking the middle.
- Gaming velocity for perceived consistency.
Symptoms
- Homogeneous story sizes regardless of work type.
- Few debates or questions during pointing sessions.
- Velocity becomes the focus, not team clarity.
Root Causes
- Misuse of velocity as a performance metric.
- Comfort with consistency over conflict.
- Absence of shared understanding of story complexity.
Remedy
Reframe estimation as shared learning. Encourage healthy debate, try effort/risk matrices, and use voting to explore perspective gaps.
4. The "Done Means Done" Shortcut
False Completion: Marking items “done” when no meaningful progress was made.
"We mark items as done, even if we didn’t act on them." - Scrum Master, insurance and data services firm
Marking something "done" in order to move forward can feel pragmatic. But it hides reality. Was the issue resolved? Deferred? Invalidated?
Without clear signals, teams lose the ability to reflect truthfully on what’s working. One team described starting every retro with a conversation about what "done" actually meant, and adjusted their practices based on whether action was taken or just abandoned.
Symptoms
- Completed items have no real impact.
- Teams disagree on whether actions were truly resolved.
- Follow-up problems recur with no reflection.
Root Causes
- Ambiguity in what "done" means.
- Lack of closure or accountability for actions.
- Reluctance to acknowledge when something was dropped.
Remedy
Introduce a "no longer relevant" tag for actions. Start every retro by reviewing outcomes of previous actions, even if abandoned.
5. Anti-Patterns in Disguise: Agile vs Agile-Like
Ceremonial Agility: Teams follow agile rituals but avoid meaningful feedback, adaptation, or empowerment.
"We're agile. But we also push work through to meet delivery at all costs." - Project Manager, large enterprise tech team
Many teams operate in agile-like environments: sprints, boards, and standups, but decision-making remains top-down, and trade-offs go unspoken.
This hybrid approach isn't inherently bad - context matters. But when teams inherit agile ceremonies without agile values, collaboration becomes box-ticking, not problem-solving.
Symptoms
- Teams follow agile ceremonies but avoid real collaboration.
- Delivery decisions made outside of sprint reviews.
- Retrospectives focus only on team morale, not system change.
Root Causes
- Agile adoption driven by compliance, not culture.
- Delivery commitments override learning and adaptation.
- Leadership sees agile as a process, not a mindset.
Remedy
Is your agile framework enabling change - or disguising command-and-control? Use retros and sprint reviews to discuss system constraints. Ask what’s driving the way work flows, and who has the power to adjust it. Make trade-offs visible and shared.
Spot the Signs, Shape the Shift
Anti-patterns don’t mean your team is failing. They mean your team is learning. The most resilient teams are the ones that catch unhelpful habits early, and have the safety and support to try something else.
Retrospectives are the perfect place to surface them - as long as they’re structured for memory, not just reflection.
In the end, anti-patterns aren’t the enemy. Silence is.
Want to take action?
Try this in your next retro:
- Surface 1 anti-pattern the team has noticed (e.g. big stories, unfinished actions, silent standups).
- Ask: Why might this have emerged? What need did it originally serve?
- Run a one-sprint experiment to shift it. Keep it small.
The cost of anti-patterns isn’t just inefficiency. It’s losing the opportunity to get better, together.
 Agile Best Practice
How to Create a Team Charter: Template and Guide for Engineering and Product Teams
High-performing teams don't happen by accident. They're built through intentional conversations about how to work together effectively.
Creating alignment isn't about one-off workshops. It's about clarity that sticks. A team charter gives agile teams the shared understanding they need to work better together, especially as teams grow, change, and evolve how they work. Without one, ambiguity creeps in, especially in remote or distributed environments where body language and hallway conversations aren't an option.
TL;DR
- A team charter is a shared agreement that defines how a team works together.
- It helps build trust, align expectations, and reduce friction.
- Creating one involves four stages: define purpose, agree on behaviours, map workflows, and embed the document.
- It evolves with the team and supports onboarding, retros, and continuous improvement.
What is a Team Charter?
A team charter is a living document co-created by the team. It outlines the team's shared understanding around purpose, values, responsibilities, and ways of working. It sets the tone for how people communicate, collaborate, and make decisions.
Think of it as a blueprint for a high-performing team: aspirational, but grounded in the daily realities of team life, and aligned with agile ceremonies like stand-ups, sprint reviews, and retrospectives that reinforce shared understanding. It reduces duplication, limits confusion, and gives structure to how we operate - even when the unexpected shows up.
Benefits of a Team Charter for Agile Teams
At its core, a team charter addresses the fundamental questions that cause most team dysfunction:
- What is our purpose as a team? Why do we exist?
- What is within the scope of our team?
- What outcomes are we accountable for?
- How do we treat each other as team members?
- How do we make decisions and communicate?
- What are our individual roles and responsibilities?
- How do we celebrate success?
What a Well-Crafted Team Charter Can Unlock
1. Clarity and Alignment
A team charter serves as a clear roadmap that defines the team's mission, goals, roles, and responsibilities. It ensures everyone understands how their work contributes to team success.
2. Better Decision-Making
When responsibilities and communication protocols are clear, decisions are made faster and more consistently.
3. Improved Communication
Establishing communication norms upfront ensures smoother knowledge sharing and transparency.
4. Accountability and Ownership
Team members know what they're responsible for, fostering commitment and initiative.
5. Trust and Team Cohesion
The collaborative process of creating a charter builds trust and empathy, and strengthens team dynamics.
6. Continuous Improvement
Team charters encourage feedback and reflection, evolving with your team over time.
7. Streamlined Onboarding
Team charter serves as a vital guide for new team members, offering clear insight into the team's norms, values, and workflows, accelerating their integration and boosting early productivity.
8. Living Reference Document
The charter acts as a reference tool that keeps everyone grounded and aligned as the team changes.
Four Practical Steps to Build a Team Charter
The team charter process is typically split into four interactive sessions. Each phase builds on the last and creates the trust, clarity, and psychological safety needed for the next.
Phase 1: Define Purpose and People
The team's mission refers to the objective or goal that a team is set to achieve. It is a clear and concise statement that defines the team's purpose and the value it aims to deliver.
Start by co-creating the team's mission statement. Team members contribute by answering: "What value do we deliver? What impact do we want to have?"
Everyone shares their input, then the team votes on the mission statements that resonate most. You can even combine parts from several to create the final version.
Once established, the mission should be displayed publicly where everyone can see it and team members can reference it.

Then we go deeper, with Personal Operating Instructions (POIs). This phase focuses on understanding team members as individuals. Each person answers questions like:
- What do you love about your job?
- What motivates you?
- How do you like to work?
- When do you work best?
- What do you want help to look like?
This helps us build empathy and challenge assumptions. It makes team members understand behaviours and uncover ways to support one another.

Phase 2: Create a Working Agreement
A working agreement is a team-designed agreement for an aspirational set of values, behaviours and social norms. Think of it as a vision for how it would be to work in an incredibly safe and powerful team.
This is where the real power lies, where you get specific about operations. Through a mix of guided reflection and group synthesis, the team explores questions like:
- What makes a great team vs. a terrible team?
- How do we communicate?
- How do we make decisions?
- What are our top responsibilities?
- What are our daily rhythms (e.g., stand-ups, reviews)?

And don’t stop at logistics, go deeper:
- How do we give feedback?
- What do we do when someone’s stuck?
- How do we balance collaboration and deep work?
- How do we share knowledge?
- How do we run meetings?
- How do we support remote or hybrid work?
- How do we protect focus time?
- How do we resolve disagreements?


From this, draft short, memorable working agreement statements. For example: "We default to asynchronous communication whenever possible," or "We commit to reviewing pull requests within 24 hours." Themes like "Diverse opinions welcome" or "Refactoring is a first-class citizen" should emerge.
💡 Tip: If your team uses Easy Agile TeamRhythm, you can incorporate these agreements into planning and retro directly.
Here are two examples of working agreements:

Image Source 
Image Source Phase 3: Map an Operational Agreement
Next, turn principles into rituals. Visualise your delivery flow using tools like Kanban boards, swimlanes, or service blueprints, whatever format helps your team see the full picture clearly:
- Who leads each stage?
- What’s working?
- What’s broken?
- What needs to be true for work to move forward?
Capture frictions around unclear ownership or ambiguous definitions. This surfaces hidden blockers and leads to better alignment.
💡 Tip: Consider using a collaborative tool like Miro, Easy Agile Programs, or whiteboarding sessions to map your current process together.


Phase 4: Make It Stick
A charter only works if it lives in your team’s daily rhythm. Otherwise, it risks becoming 'shelfware' that gets created once and forgotten. Keep it active, visible, and revisited to maintain its impact.
- Share and communicate: Make it accessible and visible.
- Live by the charter: Role model the behaviours you agreed on.
- Review and update regularly: Revisit and evolve it as your team changes.
- Use as a reference: Ground retrospectives and decisions in it.
- Reflect often: Use it to discuss what’s working and what’s not.
💡 Tip: Add your charter as a living page in your team workspace (like Confluence) and link to it in your planning tools.
Onboarding New Team Members with a Charter
When someone new joins the team, it's time to review the charter. Here’s a step-by-step onboarding process:
- Initial walkthrough: A team lead introduces the charter and context.
- Time to absorb: The new member reads and reflects.
- Team review: The team invites their feedback and updates the charter together.
This creates buy-in and strengthens psychological safety.
💡 Tip: Schedule a 30-minute team check-in with each new hire after their first two weeks to revisit the charter together.
The Foundation of High Performance
A team charter isn’t just a document. It’s a shared commitment to how you work together. It evolves as your team does, helping you navigate change and stay aligned.
If there’s one thing we’ve learned, it’s that culture isn’t declared. It’s designed, together.
Whether forming a new team or elevating an existing one, your charter is a powerful first step toward intentional, aligned collaboration.
Suggested Next Step
If you're looking to embed your team charter into your team's everyday rhythm, Easy Agile apps like TeamRhythm and Programs help teams turn working agreements into action by aligning daily rituals such as sprint planning, stand-ups, retrospectives, and PI planning.
 Agile Best Practice
Agility Starts with People: Inclusion, Learning Styles, and Psychological Safety
High-performing agile teams thrive on adaptability, collaboration, and continuous improvement. But for learning to truly happen, teams need psychological safety—a culture where people feel comfortable speaking up, sharing ideas, and acknowledging failures without fear of judgment. One of the most overlooked aspects of team inclusion in agile team dynamics is how people learn. Not everyone processes information the same way, and understanding diverse learning styles can help create environments where all team members feel supported, engaged, and empowered to contribute.
Want to find out your specific learning preferences? Download your free Learning Style Quiz and Guide on how each learner type absorbs knowledge best.
Understanding Learning Styles and Learner Types
Think of a time you learned something quickly and effectively, and try to pinpoint what made it work for you. If it was a learning experience you enjoyed and found useful, the way the information was presented was probably well aligned with the way your brain likes to process new knowledge. For some people, that might look like videos, or a chance to practice and apply, or having time to read and take notes down.
Understanding your own learner type and how you best process information will improve your self-awareness at work, enabling you to learn more effectively and advocate for your learning needs.
But why is it important to understand the learner types of those around you?
- Team awareness → Adapt to others, improve team collaboration and inclusion
- Leaders & trainers → Support diverse learners, create accessible environments
- Inclusion → Recognizing and valuing different ways people process information and communicate
- Psychological safety → People learn best when they feel safe to ask, experiment and fail
Before we get into looking at the four learning styles, let’s take a moment to recognize that learning preferences aren’t one-size-fits-all—many people have a mix of preferences and may not fit neatly into just one category. Diverse learners—those who process, absorb, and express knowledge in different ways—benefit from flexible approaches, and may align with more than one learning style, parts of a few, or none at all. Neurodiversity in the workplace is an important consideration here—neurodivergent individuals often have unique information processing styles and may need additional support to ensure they can engage effectively. The key is to find what works best for you and create an environment where everyone can learn in their own way.
The VARK Learning Model: Four Learner Types
The VARK learning model categorizes learners into four main types:

Psychological Safety & Team Inclusion in Agile
Now that you understand your own learning style—and that others may learn very differently—let’s talk about how this contributes to team effectiveness.
Learning, growth, and innovation are cornerstones of high-performing agile teams, but these things don’t happen in isolation. They can really only happen in environments where people feel safe to ask questions, experiment, and share ideas. It is well known that a key factor of successful and effective agile teams is their positive, healthy culture, and this is where psychological safety and inclusion come in.
Psychological safety and inclusion are essential for agile teams because they:
- enable people to learn and grow
- help teams adapt and change quickly
- reduce fear of failure, leading to innovation
- prevent misalignment and financial loss due to fear of speaking up
Inclusion and psychological safety aren’t just ‘nice to have’ - they make agile work.
➡️ What is inclusion?
Ensuring that everyone, regardless of background, identity, or learning style, has equal opportunity to contribute, feel valued, and thrive in a team or workplace.
How to foster inclusion in the workplace:
- Adapt communication and learning approaches to support different learner types.
- Create accessible ways for everyone to engage e.g. visuals, discussions, written formats, hands-on activities.
- Actively seek out and respect different perspectives in meetings, planning, and decision-making.
- Ensure all voices are heard by structuring discussions to prevent dominant voices from taking over.
➡️ What is psychological safety?
A team environment where individuals feel safe to speak up, take risks, ask questions, and share ideas without fear of judgment, rejection, or punishment.
How to build psychological safety in the workplace:
- Normalize giving and receiving feedback in a constructive, blame-free way.
- Encourage curiosity—frame mistakes as learning opportunities rather than failures.
- Leaders should model vulnerability by admitting when they don’t have all the answers.
- Create a culture where all input is valued by acknowledging contributions, even if they aren’t implemented.
Agility is a learning process
The strongest agile teams learn, adapt, and have a culture of continuous improvement. Psychological safety enables teams to ask questions, challenge ideas, and experiment without fear - key to fast and effective feedback mechanisms.
Why psychological safety matters for all learners…
People process information differently—safe environments let all learners express needs, engage in their way, and contribute fully. Diverse learners, including neurodivergent team members, may not fit one learning type—psychological safety ensures they can ask for what they need without judgment, and feel valued for the way they engage with and process information.
The impact on agility?
- Align: Safety fosters open discussion → better decisions, clear priorities.
- Improve: Teams feel safe to experiment → faster learning, better solutions.
- Inform: Feedback flows freely → smarter investment decisions, stronger adaptability.
What does this look like in practice?
Retrospectives: The Ultimate Learning & Inclusion Space
Retrospectives are where Agile teams pause to reflect, learn, and improve. But for a retro to be effective, it must be psychologically safe and inclusive—because without trust, learning can’t happen.
So, what makes a retrospective psychologically safe and inclusive?
✅ All voices are heard → Everyone, regardless of communication or learning style, has a way to contribute.
✅ Blame-free reflection → The focus is on learning and improving, not pointing fingers.
✅ Actionable follow-through → The team sees real change as a result of their input, building trust.How to Create Inclusive & Safe Retros
To ensure your retrospectives work for all learning styles, consider:
- Use multiple ways to gather input → Anonymous feedback, written reflections, open discussion, or interactive boards.
- Encourage different communication styles → Some may prefer speaking up in the moment, while others need time to process and write.
- Follow through on feedback → If teams don’t see changes happen, engagement will drop.
A great retro is not just a meeting—it’s a space for learning, collaboration, and trust-building. And the right tools can help.
How Easy Agile TeamRhythm Helps Agile Teams Run Inclusive, Psychologically Safe Retros
While Easy Agile TeamRhythm is a Jira app built for creating, estimating, and sequencing work at a team level on an interactive user story map, it is also a platform for running engaging and effective agile retrospectives. The retrospectives feature of Easy Agile TeamRhythm allows uses to create and track action items from retros by group feedback, identifying themes, and converting them into Jira issues for each planning. You can use templates, mood surveys, and timers to keep your ceremonies focused and effective.
Build collaboration and improve team alignment
Easy Agile TeamRhythm makes team retrospectives boards the hub for learning and improvement, allowing teams to celebrate wins, share learnings, and improve their team alignment and workflow. The ability to set privacy and permissions ensures that team information is only available to those your team trusts.
How Easy Agile TeamRhythm features create psychological safety and inclusion

Final thoughts
Inclusion and psychological safety aren’t just concepts—they’re the foundation of high-performing Agile teams. By recognizing different learning styles, creating space for all voices, and fostering a culture where people feel safe to learn and experiment, teams can truly thrive. What’s one thing you’ll do to make your Agile team more inclusive, supportive, and effective? Small changes can have a big impact.
Start building more inclusive, collaborative teams
Download your free copy of the Learning Style Quiz. Use it to gain lasting insights into how your team learns and works best.
 Agile Best Practice
Why Your Retrospective Isn’t Broken - But Your Follow-Through Might Be
Across hundreds of teams, we saw the same pattern: retrospectives were happening regularly, thoughtfully - and yet, less than half the retrospective action items ever got completed. Teams kept identifying valuable improvements, but those improvements stalled in execution. Instead of driving change, the same issues resurfaced sprint after sprint.
When we spoke with customers, they weren’t unclear on what to improve - they were actually stuck on how to follow through. The lack of visibility, accountability, and prioritization made progress feel out of reach.
That frustration led us to rethink how we approach retrospectives. Not just in the room, but in the days and weeks that follow. Because while most teams know how to reflect, far fewer know how to move forward.
Want to dive straight into action? Grab our free Retrospective Action Template here - a clear, practical guide to help your team stop spinning in circles and start making progress that actually sticks.
Or if you're keen to understand the deeper why behind this challenge, keep reading.
The invisible graveyard of good ideas
Think back to your last few retros. You likely surfaced blockers, celebrated wins, maybe even explored a tough team dynamic. The discussion probably felt honest - valuable, even.
Now ask yourself: What actually changed as a result?
Too often, retrospective action items, even the well-intentioned ones, are lost to the shuffle of a new sprint. The Jira board fills up, the deadline looms, and those carefully considered ideas fade into the background.
It’s not that teams don’t care. It’s that we often lack a system for taking action from team retrospectives in a way that’s trackable and integrated with our actual work.
We’ve seen the pattern: teams revisit the same problems retro after retro. Over time, that repetition chips away at trust. "Didn’t we already talk about this?" becomes the refrain, and eventually, the retro starts to feel like a ritual with no reward.
The follow-through problem
Most retrospectives don’t fail during the session itself; they falter in the days and weeks afterward. According to a poll in PMI's community, nearly two-thirds of respondents implemented fewer than 25% of the ideas from their retros - none reported implementing more than 75%.
"If your team consistently creates action items during Retrospectives but rarely completes them, you’re not alone. Unfinished action items are a major productivity killer and lead to stalled progress. The key to real improvement isn’t in creating long lists—it’s in following through. By treating Retrospective action items with the same importance as other Sprint tasks, your team can finally break the cycle of unfinished improvements and see real, beneficial change, individually and at the team level." - Stefan Wolpers, Age of Product
Follow-throughs often break down because of:
- Lack of clear ownership
When an action item belongs to 'everyone', it ends up belonging to no one. Teams that don’t assign a specific owner are less likely to see the item through. Accountability is a critical lever for ensuring follow-through and it’s often overlooked, especially in team-wide retros.
- No deadlines:
Action items without a timebox drift into the background. Teams frequently delay or deprioritize tasks that aren’t linked to specific sprint milestones or review points. Time-bound goals make follow-up tangible and measurable.
- Vague outcomes:
Teams often fall into the trap of writing retrospective items as intentions rather than actions. Broad phrases like “improve communication” or “fix our process” lack specificity. Without a clear 'what' and 'how', nothing moves.
- Too many actions:
When every idea from the retro becomes an action item, focus disappears. Prioritization is vital. Teams need to pick one or two meaningful improvements that are realistic for the sprint ahead. Otherwise, everything feels equally important—and nothing gets done.
- Poor visibility:
Action items are often scattered - living in whiteboards, static docs, or someone's memory. If teams can’t see what they committed to, they won’t act on it. Integrating follow-up tasks into the team’s daily tooling (like Easy Agile TeamRhythm in Jira) makes accountability unavoidable.
All of these factors add up to the same end result: a wide gap between good intentions and real progress. In our own usage data of Easy Agile TeamRhythm, teams were completing only 40–50% of their retrospective action items. After releasing features to surface and track incomplete actions, that completion rate jumped to 65%. Better follow-throughs, not just better conversations, are needed to drive real progress.
Common retrospective anti-patterns and their solutions
nti-patterns are common but counterproductive approaches to recurring problems that initially appear helpful but ultimately lead to negative outcomes. Unlike simple mistakes, anti-patterns are deceptive - they feel like the right thing to do in the moment but create deeper issues over time.
Teams consistently struggle with follow-through due to a combination of anti-patterns that weaken accountability and momentum. Here are the most common retrospective anti-patterns we see and how to address them:
1. The groundhog day pattern
Anti-pattern: The retrospective never changes in format, venue, or length, leading to the same issues being discussed repeatedly without resolution.
Why it happens: Teams fall into comfortable routines that feel "safe" but become stale and ineffective over time.
Solution: Vary your retrospective format regularly. Use different techniques like Start-Stop-Continue, 5 Whys, or Timeline Retrospectives. Change venues when possible - even moving from a conference room to an open space can shift energy and perspective.
2. The UNSMART action trap
Anti-pattern: Teams create action items that are vague, unmeasurable, or unrealistic (e.g., "improve communication" or "be more agile").
Why it happens: In the moment, broad aspirations feel meaningful, but they lack the specificity needed for execution.
Solution: Apply the SMART criteria to every action item: Specific, Measurable, Achievable, Relevant, Time-boxed. Instead of "improve communication," try "implement daily 15-minute team check-ins for the next two weeks."
3. The blame game
Anti-pattern: Retrospectives become cycles of finger-pointing and complaints without constructive problem-solving.
Why it happens: Teams lack psychological safety or facilitation skills to move from problems to solutions.
Solution: Establish "Vegas rules" (what's said in the room stays in the room) and focus on systems rather than individuals. Use techniques like "How might we..." questions to shift from blame to solution-oriented thinking.
4. The accountability vacuum
Anti-pattern: Action items are assigned to "everyone" or "the team," meaning no one feels personally responsible.
Why it happens: Teams want to avoid singling people out or assume collective ownership will naturally emerge.
Solution: Assign every action item to a specific person, even if execution involves the whole team. That person becomes the "champion" responsible for driving progress and reporting back.
5. The external focus trap
Anti-pattern: Teams spend most of their retrospective time discussing issues completely outside their control (other departments, management decisions, external dependencies).
Why it happens: External frustrations are often more emotionally charged and easier to discuss than internal team dynamics.
Solution: Use the "Circle of Influence" technique. Acknowledge external constraints briefly, then redirect focus to what the team can directly control and improve.
6. The documentation desert
Anti-pattern: No one takes notes or tracks what was discussed, leading to forgotten insights and repeated conversations.
Why it happens: Teams underestimate the value of retrospective outcomes or assume everyone will remember key points.
Solution: Designate a rotating note-taker and create a simple tracking system for action items. Include photos of boards or flip charts to capture visual elements.
7. The participation paradox
Anti-pattern: Some team members dominate discussions while others remain silent or disengaged.
Why it happens: Personality differences, power dynamics, or lack of structured facilitation create unequal speaking opportunities.
Solution: Use structured techniques like silent brainstorming, dot voting, or time-boxed speaking turns. Actively invite quieter members to share and ensure psychological safety for all voices.
A 5-step system for retros that lead to progress
Here’s the rhythm we’ve seen work across resilient, high-performing teams:
- Prepare with purpose
- Revisit action items from the previous retro - not just to tick them off, but to understand what’s changed since they were raised.
- What moved forward? What didn’t? Why?
- Clear out what’s stale. Highlight what’s still relevant. Identify patterns that deserve deeper discussion.
- Focus the dialogue
- Get beyond symptoms. Dig into root causes.
- Use tools like “5 Whys” to sharpen your thinking.
- Anchor the discussion on: What’s urgent and worth solving now?
- Prioritize with intention
- Don’t try to fix everything. Use an Impact/Effort Matrix to filter.
- Choose 1–2 action items to commit to.
- Assign owners. Define success. Agree on timelines.
- Track where you work
- Use a retrospective action tracker that lives inside your workflow.
- In Easy Agile TeamRhythm, you can surface incomplete items, view their history, sort by relevance, and understand their context - all without switching tools.
- Close the loop - every time
- Review previous action items at the start of each retro.
- Celebrate what’s done, even if it's small.
- Reassess what to keep, modify, or drop.
- Measure progress
Start tracking your continuous improvement progress with simple, actionable metrics:Measuring these over time tells you whether you're improving how you improve.- Action Item Completion Rate – % of action items completed before the next retro (target: 80–100%)
- Recurring Issues Rate – How often the same topic resurfaces across retros
- Average Age of Open Action Items – How long improvement tasks stay unresolved
- Retro Participation Rate – % of team actively contributing to retro inputs or votes
Stop repeating the same conversations
A team retrospective that works isn’t one that just uncovers issues - it’s one that resolves them. Building a habit of follow-through transforms retros from a passive meeting into a lever for real change.
If your retros feel like déjà vu, the problem might not be how you talk. It might be what happens after.
🎁 Get the full framework
We’ve distilled all these lessons and more into a practical, field-tested Retrospective Action Template. Inside, you’ll find:
- A step-by-step worksheet
- Guidance for assigning and tracking scrum action items
- Examples of achievable retrospective action items
- Built-in strategies for how to make a retrospective meaningful
👉 Download the free template here.
You’re already talking about what matters. Let’s make sure you act on it.
 Engineering
Time-Saving VSCode Shortcuts to Boost Developer Productivity
Efficiency is key for engineers, mastering keyboard shortcuts in Visual Studio Code can save valuable time and allow more time focusing on problem solving. Instead of navigating through menus, the right shortcuts let you code faster, refactor seamlessly, and stay focused. In this guide, we’ll cover essential shortcuts in a TypeScript setting that will streamline your workflow and boost your productivity.
IntelliSense Code Completions
Most the time you'll probably use code completions whilst typing but sometimes it can be quicker to manually trigger it to quickly get a property or parameter value. On both MacOS and Windows the shortcut is Ctrl+Space.

Code Snippets
This isn't necessarily a shortcut but I wanted to included it because it can save a lot of time when entering repeating code patterns. Code snippets are essentially templates that are created by you or the community to make entering repeating code patterns such as loops or conditional statements much faster. You may have noticed them before when the intellisense code completions popup menu shows, they can be identified with the square icon. I frequently write TypeScript so I commonly make use of the built in JavaScript snippets, an ES7 + React extension and some custom Jest snippets. I highly recommend the Snippets user guide on Visual Studio Codes documentation if you want to get started with this one!

Rename Symbol
This shorcut allows you to rename the function or variable your cursor is on. It will rename its definition and all of its references. On both MacOS and Windows the shortcut is F2.

Fast Imports with Quick Fix
Manually importing variables and functions can be time consuming, thankfully with the quick fix feature this becomes a lot quicker. When your cursor is on a line with an error or warning you can activate it with ⌘+. on MacOS or Ctrl+. on Windows. Be sure to fact check the import suggestions if you're dealing with a larger codebase that could have multiple definitions for the same variable or function. In these larger environments it may initially give you the wrong suggestion!

Refactoring
This feature allows you to move the highlighted code into a reusable variable or function. It can come in handy if you tend to just hack the code together initially then refactor and polish it before pushing it to your remote branch and getting peer reviews. On MacOS the shortcut is ⌘+⇧+R and for Windows they are Ctrl+Shift+R.

Move Line Up/Down
The move line up or down feature will do just that, move the line your cursor is on up or down. This also works if you highlight multiple lines too. I use this pretty often, because honestly I'm human and I don't always get the order of my code correct the first time. On MacOS the shortcuts are ⌥+↑/↓ and Windows they are Alt+↑/↓.

Go to Definition & Show References
If you're hovering a references to a variable or function the go to definition will do exactly that. Similarly, if you're hovering a variable or function declaration the show reference shortcut will show a menu of all the references if theirs multiple or go directly to the reference if theres just one. on MacOS the shortcuts are F12/⇧+F12 and Windows they are F12/Shift+F12.

These shortcuts are great but personally I find F12 to be a little far from my general hand placement on a keyboard so I opt to use ⌘/Ctrl+left click which I use frequently and works for both features.
Organize Imports
This shortcut will remove any unused imports, sort existing imports by file paths, and sort named imports as well. On MacOS, the shortcut is ⌥+⇧+O and Windows Alt+Shift+O.

This is a wonderful shortcut to save time cleaning up your imports before performing a commit if you're in the habit of using it, but you might prefer to edit your settings.json with the follow configuration so the IDE does it for you on save. The settings.json can be found by opening the command palette(MacOS & Windows: F1) and searching for it.
These shortcuts are just the top ones I frequently use or plan to use more of, but theres a plethora of keyboard shortcuts for Visual Studio Code. If you're looking to boost your efficiency within Visual Studio Code even further, they provide a cheatsheet for MacOS and Windows which can be good to keep handy.
 Engineering
How to Build Observability for Forge Applications
Observability is a crucial aspect of building and maintaining reliable applications, and at Easy Agile, we've dedicated significant effort to making our applications as observable as possible. In a recent talk at Atlas Camp 2025, Ryan Brown, our Staff Engineer, shared our experiences transitioning to Forge and the lessons learned along the way. Here are the key highlights from his talk.
What is observability and why it matters
Observability is about gathering and visualizing enough data to understand the health of your software systems and fix problems when they arise. Unlike traditional monitoring, which tells you what happened and when, observability goes a step further to explain why and how issues occur.
For us at Easy Agile, strong observability has:
- Helped us make better decisions about performance and infrastructure needs
- Drastically improved our customer support by letting us quickly pinpoint issues
- Let us adapt to the reality of modern, distributed applications
As Ryan put it during his talk: "When I was working on applications back in the day, we were running on two, three, maybe four data centers at most. Now we're talking about applications that grow at a global scale with people using them across the globe."
Modern applications are far more distributed than they used to be, with thick frontends becoming as complex as backends. This distribution makes the traditional approach of manually checking a few servers inadequate - we need sophisticated observability solutions to understand what's happening across our systems.
The three pillars of observability
Observability stands on three key pillars:
Metrics
These are the number-based measurements of your software - CPU usage, request times, error counts, and so on. But raw numbers alone aren't very helpful. Context is critical - knowing you have five errors is very different from knowing you have five errors from one specific user on one server over two minutes.
Metrics become particularly powerful when identifying trends over time, so you can pinpoint when performance issues began or correlate changes with system behavior.
Logs
Logs are often the first thing engineers get experienced with when dealing with observability. They provide detailed records of events and are the cornerstone of understanding what's happening in your system. They give more information than metrics alone, capturing not just what happened but details about each event that occurred.
They're richer in information but also generate more data. For example, logs might tell you an error occurred because an API returned a bad response - but that alone still doesn't tell you why the downstream API failed.
Traces
Traces help you understand what's happening across all your systems working together. They track transactions as they flow through various services, showing you exactly what happens when a user clicks a button or performs an action.
"Tracing is surprisingly simple," Ryan explained. "You just have a unique identifier for a transaction that gets shared from one system to the next system to the next system."
Traces are particularly useful when you can expose that identifier to end users when something goes wrong. That ID can show you exactly what happened in that transaction, taking the guesswork out of troubleshooting.
Observability on Connect vs. Forge
Our current Connect approach
At Easy Agile, we've implemented comprehensive observability across our Connect apps.
- Metrics, logs, and traces captured for all our applications
- All this data sent to a third-party observability service to get a centralized view
- Front-end components that also send observability data to the same service
The approach reduces cognitive load on our engineers and gives complete end-to-end visibility into user journeys and what's happening across our systems. For this Ryan recommends that you can use commercial services like Datadog or New Relic, or even open-source options like Signoz.
Transition concerns for Forge
When we first looked at Forge, we had several questions:
- How well would tracing work with Forge's communication model?
- Could we define our own custom metrics?
- Would we be able to collect metrics and logs from both front-end and back-end?
- Could we identify specific user transactions for support purposes?
At the time of our evaluation, Forge functions were the primary compute option available, which raised questions about how standard tracing libraries would work in Forge's unique communication model.
Experimenting with a simple app
Instead of trying to migrate one of our bigger products, we created a simple "Sprint Notes" app to test observability on Forge. This let us:
- Quickly iterate through different Forge topologies
- Keep the experiment focused on observability
- Include all the necessary components (UI, API, database)
We took this app through several stages:
- Connect on Forge: Running our Connect app through Forge
- Forge with Remotes: Using two approaches - calling remotes through Forge functions, and calling remotes directly from the UI
- Forge Native: Completely rewriting the app to use Forge functions and entity store
Key findings
Connect on Forge
When running our Connect app through Forge:
- All our existing observability worked without modifications
- Front-end and back-end metrics continued to function as before
- Tracing identifiers propagated correctly
- Logs and metrics didn't appear in the Atlassian Developer Console (which makes sense since we weren't using Forge modules)
The observability story for Connect on Forge is pretty straightforward - it just works. As Ryan noted, "All the existing observability that we had in place on Connect worked just as it did before. There was no big change or issues with what we saw there."
We even experimented with different methods of sending data to our observability service, including using a proxy under our own domain, and everything worked consistently as long as the correct content security headers were set.
Forge with remotes
For Forge with remotes, we found:
- Front-end and back-end observability mostly worked
- We had to set permissions.external.fetch.client to allow sending metrics from the front-end
- Adding these permissions required a major version upgrade
- Metrics didn't capture all API calls, particularly front-end calls to Atlas APIs
- Tracing identifiers weren't exposed to remote callers, limiting end-to-end tracing
"This is a little disappointing... we found that when we did calls to our remotes, Forge would generate tracing identifiers for use on the back-end, but unfortunately those identifiers weren't then being exposed to what was making those remote calls," Ryan explained.
While we could see logs in the Developer Console and some metrics were captured, the inability to propagate tracing identifiers back to callers meant we couldn't achieve full UI-to-database traceability or show transaction IDs to end users without implementing workarounds.
Forge native
With a fully native Forge approach:
- Custom metrics and basic tracing are possible but require significant work
- We needed to implement custom handling with libraries like OpenTelemetry
- UI observability remained similar to the remotes implementation
- We could access correlation IDs through undocumented Forge API features
We managed to create a proof of concept showing traces from Forge functions to our observability service, though implementing complete data store tracing would require additional work.
Recommendations and best practices
Based on our findings, we recommend:
1. Establish observability baselines
Figure out what data you genuinely need instead of collecting everything. Observability services charge by volume, so collecting unnecessary data can quickly become expensive.
2. Use OpenTelemetry
It aligns with Forge's internal implementation and provides good standardization. While it may be harder to use than some out-of-the-box solutions, the long-term benefits are worth it.
3. Consider an observability proxy
This enables:
- Authentication for incoming metrics
- Adding additional context
- Data redaction for sensitive information
- Decoupling your implementation from specific providers
When combined with OpenTelemetry, this approach means your Forge components don't need to know what observability service you're using, avoiding permission changes if you switch providers.
4. Plan permission updates strategically
Since they require major version upgrades, incorporate them early in your development.
5. Other important considerations
- Major version upgrades are required when adding permissions for observability
- The documentation for exporting logs and metrics is technically correct but easy to misinterpret
- Traces do not automatically propagate back to callers in remote implementations
Final thoughts
Achieving all three pillars of observability on Forge is possible, though it requires different approaches depending on your implementation strategy:
- Connect on Forge works seamlessly with existing observability
- Forge with remotes requires some additional configuration
- Forge native needs more custom implementation
These experiments are being prepared for open source, so stay tuned to Ryan's LinkedIn for updates.